Mary’s Award Winning Chocolate Chip Cookies

Last winter, I was on a mission to find a chocolate chip cookie recipe to love. Don’t get me wrong, I love the queen of all chocolate chip cookie recipes, the one I have known by heart since I was ten, the venerable Nestle’s Toll House Chocolate Chip Cookie. But I was looking for something thicker and less crunchy.

It turns out I was looking for my friend Mary’s chocolate chip cookies!

Did you know that back in the 1930s, when Toll House Inn owner Ruth Wakefield first published her famous cookie recipe, she called it Toll House Chocolate Crunch Cookie? Ruth meant for her cookies to be crunchy!

I tested many recipes during my search for a chewier cookie.

In the end, I couldn’t find a favorite and instead wrote a post about cookie dough scoops, Cookie Scoops as a Unit of Measure.  Who knew the tiny numbers on scoops described the number of scoops of dough in a one-quart container? Or, used another way, how many scoops of ice cream one could get from a one-quart container.

I may not have found the recipe I was looking for, but I did learn a nifty way to use a scoop to measure and freeze uniform cookie dough amounts.

My kids were the winners here — they went home with bags full of frozen test batches of cookie dough whenever they stopped by for a visit.

Ultimately, I realized my favorite cookie was the one my dear and funny, food-styling, recipe-developing, artistic friend, Mary Carter, sold back in the summer of 2011 at Nashville’s 12South Farmers Market.

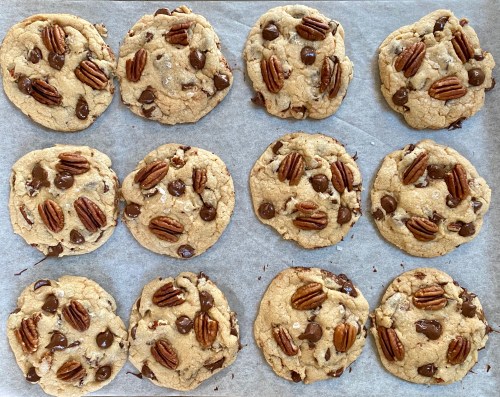
Her best selling cookie was Pecan and Chocolate Chip Cookies with Sea Salt. She submitted the recipe to Southern Living Showhouse’s  “Ultimate Southern Cookie” contest and took home first place!

I ask you, What is not to love here?

I tried making Mary’s recipe, but my cookies didn’t come out as well as hers. Last week, she came over to bake them together to see what I was doing wrong. I learned I was mixing the batter and baking the cookies for too long and using too much flour. To develop a reliable amount of flour, I weighed each cup as she added it to the batter. The cookies came out perfectly under her tutelage.

A few words on measuring flour:

When I write recipes, I envision how my boys would make them. IF they were to measure flour, they would surely stick a measuring cup into the flour, use their finger to level it off, and dump it into the batter.

So, that’s what I did. I measured out 4 cups of what turns out to be packed flour. It weighed 21 ounces.

I was taught in Home Ec to fluff up the flour first, spoon it into a dry measuring cup, and level it off. Measured that way, 4 cups of flour weighs 18 ounces (4½ ounces/cup). That’s almost an extra cup of flour I was adding to Mary’s recipe.

Pro Tips

Before we get started on the recipe, here is a list of baking tips I learned from Mary on our afternoon together.

  • Do not overmix the fat, sugar, and eggs. A soupy batter leads to pancake-like cookies. When Mary makes these cookies at home, she dumps all the ingredients at once into her favorite mixing bowl and mixes them by hand.
  • Mary uses self-rising flour when developing recipes. Cup for cup, it has the correct proportion of flour to baking powder and salt, making it easy to increase or decrease flour as she creates new recipes.
  • One level cup of self-rising flour weighs 4.50 ounces and is comprised of:
    1 cup all-purpose flour
    1½ teaspoons baking powder
    ½ teaspoon salt
  • Bake cookies for less time than seems right. Mary bakes them until they just start to tan on the edges and are still quite pale in the center. She leaves them on the pan to cool completely.
  • Placing pecans on top of the cookie allows them to toast while cooking. Toasting nuts gives them extra flavor.
  • Place 3 chocolate chips on top of each cookie before baking; that’s a food-styling tip.
  • As soon as the cookies come out of the oven, Mary uses the tip of a spatula to smush the edges inward that have spread out too far. It makes the cookies rounder and taller. Here is a video of her demonstrating.

Mary’s Southern Pecan and Chocolate Chip Cookies with Sea Salt

Yield:  24 3-inch cookies

Ingredients:

½ cup (1 stick) salted butter, at room temperature
½ cup vegetable shortening
1 cup light brown sugar
1 cup granulated sugar
½ teaspoon fine sea salt
1 teaspoon pure vanilla extract
2 large (4 ounces) eggs
3¾ cups (17 ounces) self-rising flour
2 cups (12 ounces) semi-sweet chocolate chips
½ cup chopped pecans (optional)

Topping Ingredients:
1 tablespoon sea salt flakes or fine sea salt
¼ cup semi-sweet chocolate  chips
1 cup pecans

Instructions:
Preheat oven to 350º.

Add butter, shortening, sugars, salt, vanilla, and eggs into a mixing bowl.

Blend together for one minute on medium-low speed. Halfway through mixing, turn the mixer off and scrape down the sides and bottom of the bowl.

Add flour and mix on slow speed until flour is just incorporated into batter, about 45 seconds. Fold in chocolate.

Using a #30 (2-ounce) cookie scoop, place dough on a parchment-lined or ungreased, insulated cookie sheet.

Gently flatten the top of each cookie with the palm of your hand.

Sprinkle each cookie with sea salt flakes or fine salt, three pecans, and a few extra chocolate chips.

Bake for 14-17 minutes, or until cookie edges start to tan and the cookie center is still fairly pale. In Mary’s oven, that’s 14 minutes; in mine, it’s 17 minutes. Remove from oven and immediately use a spatula to adjust the outer edges as described in the video. I’ve noticed the cookies appear a little darker a few minutes after they get out of the oven.

Leave on baking sheet until cookie is completely cooled. Enjoy!

Some readers might remember a story I wrote about Mary and a food-styling job she brought me on, Food Styling with Mary Carter.

Thanksgiving is coming up. Take a look at THIS page for a list of tried and true recipes, especially Foolproof Make-Ahead Gravy, my Mom’s Pumpkin Pie, and my Grandmother’s (killer) Cranberry Chutney.

Related Posts
Cookie Scoops as a Unit of Measure
Stocking Stuffers: Tools for the Cooking Life
My Favorite Rollout Butter Cookies
How to Make Royal Icing and Decorate Cookies
Pecan Picking in Mississippi (and recipes to go with them)

If you enjoyed this post, please share it with a friend and become a follower. When signing up, be sure to confirm the subscription on the follow-up letter sent to your email.

Follow Judy’s Chickens on Instagram and Pinterest @JudysChickens.

Always check my blog for the latest version of a recipe.

© 2014-2020 Judy Wright. All rights reserved. Photos, videos, and text may only be reproduced with the written consent of Judy Wright.

My Favorite Rollout Butter Cookies

I am a baker at heart.

I love making pies for Thanksgiving, Italian cookies for Christmas, cakes for birthdays, and frosted rollout cookies for any event where children are in the house.

I loved the days as a teenager when I baked sweets for my brothers and the neighborhood kids, and then, as a mother, when I rolled out cookies with my sons.

When it comes to making dough suitable for cutting out cookies, there is one recipe I have used for the last thirty years, Bee’s Mother’s Butter Cookies. I laugh when I look at the recipe in my old cooking diary because it reminds me that at one time I thought I could save a few calories by cutting out a third of the butter. As if.

What is the difference between cookie doughs designed for rolling out versus  drop cookies? You won’t see baking powder or baking soda in the list of ingredients. Those ingredients, both leavening agents, are added to make baked goods rise, spread, and become airy. Rollout cookie dough should not spread in the pan. We want sharp, crisp edges and tender centers.

What I especially like about Bee’s recipe is it is not too sweet, it has a lovely buttery flavor, and a hint of lemon. Texture-wise, if I roll the dough out to a quarter-inch thickness, the cookies have just the right amount of chewiness for my liking. My new adjustable rolling pin assures a uniform thickness.

Even as a seasoned baker, I sometimes mess up on how long I bake cookies. I want them light in color, but if they are not cooked enough, the taste can be off from not cooking the flour long enough. If they are too dark, they are not as pretty as they could be. Cook them until the edges just start to brown. Having said all that, for whatever reason, the cookies always taste better the day after you frost them.

A few words on measuring flour:

The proper way to measure flour is to lightly spoon it into a dry measuring cup and then use the flat edge of a knife to level it. If weighed, one cup should equal 4.25 ounces.

Yield:  75 ¼-inch thick cookies

Ingredients:

6 sticks (1½ pounds) butter, at room temperature
2 cups granulated sugar
4 large eggs, at room temperature
2 teaspoons vanilla extract
½ teaspoon sea salt
1 large grated lemon rind
8 cups all-purpose flour, spooned and then leveled in a dry measuring cup

Instructions:

Measure flour into a medium-sized bowl. Set aside.

Zest one lemon. Set aside.

In a large mixing bowl, cream together butter and sugar for two minutes on medium speed. Add eggs, one at a time, vanilla, salt, and lemon zest. Beat on medium speed for 2 minutes. Be sure to scrape down dough on sides and bottom of bowl.

Add flour and mix slowly. Once it is all incorporated into the dough, mix medium-slow speed for one minute, scraping sides and bottom of bowl as you go. Cover dough and place in refrigerator to chill for two hours or up to two days.

Remove dough from refrigerator and cut into portion sizes suitable for rolling. Allow to soften for 20 minutes before rolling. Dough should be softened and still cool.

When ready to roll dough, preheat oven to 350º.

Place a segment of cool dough on a sheet of parchment paper. Lightly flour the rolling pin, the cookie cutters, and the top of the dough. The trick to creating a nicely flavored, tender cookie is to use as little extra flour as possible and to not keep reworking the dough.

Using cookie cutters, cut the shapes as close to one another as possible.

Remove the scraps and put them in a pile. After you have rolled out all the dough once, take the scraps, knead them together, chill, and roll out again.

Place cookies on a parchment-lined (or ungreased) cookie sheet. They can be arranged close together because they will not spread. I like to get all the cookies rolled out first and then cook them.

Bake for about 20 minutes or until edges just start to brown. Shift pans around in the oven midway through the cooking time for more even browning. Always remember, the back two corners of an oven are the hottest.

Cool cookies on a wire rack. Allow to cool completely before frosting.

To learn how to make and decorate with Royal Icing, please look at this post.

Sometimes, I thin the icing, brush it on the cookies, and then immediately add the sprinkles so they stick as the glaze cools.

Allow cookies to dry for two hours before stacking and storing.

Related Posts:

How to Make Royal Icing and Decorate Cookies

Italian Sesame Seed Cookies
Italian Ricotta and Lemon Cookies
Three Ingredient Peanut Butter Cookies
Oats, Ginger, and Cranberry Cookies

If you enjoyed this post, please share and become a subscriber! Be sure to confirm the subscription on the follow-up letter sent to your email address.

Follow Judy’s Chickens on Instagram and Pinterest @JudysChickens.

Always check my blog for the latest version of a recipe.

© 2014-2019 Judy Wright. All rights reserved. Photos, videos, and text may only be reproduced with the written consent of Judy Wright.

How to Make Royal Icing and Decorate Cookies

I recently helped host two parties, both for babies. One was an early celebration for my granddaughter’s first birthday. The color scheme was pink and white. All. The. Way.

The other party was a baby shower for the daughter of one of my besties, LouAnn.  The color scheme was sky blue and white, with a few cherished googly eyes thrown in.

Both parties were designed with love and whimsy. For the baby shower, co-host Nan decorated white pumpkins with ribbons. I had never considered bedecking pumpkins, but I was suddenly ALL IN on the party spirit when I saw hers. Nan’s natural enthusiasm for life has a way of doing that to you.

She inspired me to make pretty pumpkins for my baby girl’s party, but when I went to decorate them, I got a heaping case of startitis. I texted Lou Ann to see if she would work her magic on them. She whipped these up on her kitchen counter while her dinner cooked. I love them! They make me smile.

Lou Ann is one of those creatives who get in this peaceful place, and calmly creates beautiful objects. It is as much a pleasure to watch her work as it is to work alongside her. Readers of Judy’s Chickens may remember the post I wrote on how she used greens from my yard to make a stunning winter floral arrangement.

Individually Wrapped Frosted Cookies for Party Favors

One of the tasks I took on for both parties was to make frosted cookies for favors. I invited Nan and Lou Ann to come over for the morning day to help me out. I had never successfully negotiated how to use royal icing and a piping tool to decorate cookies. They were pros.

You will need a disposable piping bag and a #2 or #4 piping tip. A Ziploc bag works fine if you run out of piping bags.

Gel food coloring has more color pigment than regular liquid food coloring, so you need less, and the colors are truer. The girls taught me to poke a hole through the foil lid with a toothpick and use it to add color to the frosting. We made three bowls of icing: white, sky blue, and pink.

They showed me this nifty way of filling a piping bag.

First, they piped an outline onto the cookie to create a nice edge.

After the outline dried, they used a miniature spatula to fill in the interior space with icing. You may need to thin the icing with water first. This filling-in process is called flooding in the icing world.

In addition to piping supplies, Nan brought this awesome adjustable rolling pin that keeps the dough thickness consistent when rolling out cookies. This leads to more even baking. After we were done, I went to The Kitchen Nashville to buy one.

Here is a link to the cookie dough recipe: My Favorite Rollout Butter Cookies

How to Make Royal Icing

Ingredients:

3 ounces (6 T) pasteurized raw egg whites 3 tablespoons meringue powder
1 pound (4 cups) confectioner’s sugar
1 teaspoon pure vanilla extract or 1 tablespoon freshly grated lemon zest
Water for thinning icing, as needed
Gel Food Coloring
Piping bags and tips

I mixed all the ingredients in a mixing bowl. I made the first batch with vanilla extract and the second batch with lemon zest. Both were good. You can store leftover icing in the freezer.

After we made the blue and white cookies, Lou Ann got busy on the dresses.


When she added the pink, I melted.

After the girls left, I decorated a few cookies for my grandchildren. I pushed the easy button on those and used a pastry brush to simply slather on the frosting. Still cute, especially when I added the fun sprinkles from The Kitchen Nashville.

A Few Other Party Touches:

Leave it to Nan to come up with a specialty drink for a party. She loved this cocktail when she had it in Las Vegas and figured out how to reproduce it.

These asparagus roll-ups were the best I have ever tasted. Liz, another host for the baby shower, created them. She used a combo of Boursin and Parmesan cheese in the spread.

My daughter-in-love, Meera, ordered this delicious and gorgeous strawberry cake from Baked on 8th.

My son’s generation refers to a baby’s first birthday cake as a “smash” cake. Baked on 8th makes those as well. This one has strawberry frosting and was out of this world. The blue high chair was my husband’s father.

My future DIL, Lily, ordered flowers from the Green Hills Kroger. Ever since Lead Floral Designer Liz Blalock joined their staff, the floral department has blossomed with beautiful arrangements.

The two parties were back to back events. Each was very different, but both were filled with many delightful moments, now memories, enhanced by the special touches of all involved in planning and hosting.

Related Posts
My Favorite Rollout Butter Cookies


Winter Floral Arrangements Using Greenery from the Yard


How to Fold A Tree-Shaped Napkin


How to Make Birdhouse Gourds for Fall Decorating


Group Project: A Shibori Dyed Quilt


If you enjoyed this post, please share and become a subscriber! Be sure to confirm the subscription on the follow-up letter sent to your email address.

Follow Judy’s Chickens on Instagram and Pinterest @JudysChickens.

Always check my blog for the latest version of a recipe.

© 2014-2020 Judy Wright. All rights reserved. Photos, videos, and text may only be reproduced with the written consent of Judy Wright.

TNFP’s 3-Ingredient Peanut Butter Cookies

Recently, I was cooking at The Nashville Food Project when I spied Catering and Events Manager, Katie Duvien, pulling sheet pans full of peanut butter cookies out of the oven.

They smelled so good, I had to taste one—just a smidge. Apparently, I wasn’t the only one breaking off smidges.

“They only have three ingredients: one egg, one cup of creamy peanut butter, and one cup of sugar,” said Katie. This easily-remembered recipe makes them perfect for scaling up in a commercial kitchen or at home.

After she recited the ingredients, I was already thinking about adding crunch by using crunchy peanut butter. I made my first batch that night in the time it took another super-easy recipe, Sheet Pan Supper: Italian Sausage, Peppers, and Potatoes, to cook in the oven.

Ingredients for One Dozen

1 egg
1 cup crunchy or creamy peanut butter
1 cup sugar (either all white, or half white and half brown)

To Scale It Up:

To make 6 dozen cookies, follow this recipe: 6 large eggs, 6 cups sugar (I use ½ white and ½ brown), and 6 cups of creamy or crunchy peanut butter (one 3-pound container).

Instructions
Preheat oven to 350º

Mix eggs and sugar, add peanut butter. Use a spatula to scrape ingredients stuck along the bottom and sides of the bowl. Mix until all ingredients are evenly incorporated.

Add cookie dough by the spoonful (or use a #40 cookie scoop) to the baking sheet.

Use a fork to make the traditional crisscross pattern on top.

Bake for 12-15 minutes. Do not over-bake. As soon as the cookies have spread and started to turn light brown, they are ready. When making multiple batches, rotate baking sheets on the oven racks after eight minutes. Cool on a wire rack.

Wrap after they cool, so they don’t dry up.

PS: My friend, Jill Meese, adds 1 tablespoon of dark cocoa powder to the ingredients and says it makes the cookies mind-bogglingly good!

PPS: Here’s a good yarn about the history of the peanut butter and jelly sandwich– The History of the Peanut Butter and Jelly Sandwich

Other Darn Good Cookie Recipes:
How to Make Royal Icing and Decorate Cookies
My Favorite Rollout Butter Cookies
Mary’s Award-Winning Chocolate Chip Cookies
Italian Sesame Seed Cookies
Italian Ricotta and Lemon Cookies
Oats, Sorghum, Ginger, and Cranberry Cookies

Other fun recipes from The Nashville Food Project:
Oven-Roasted Strawberry and Rosemary Jam

Outrageous Roasted Rosemary Cashews
 

Meet the women who inspired me to cook: About

Follow Judy’s Chickens on Instagram and Pinterest @JudysChickens.

Always check my blog for the latest version of a recipe.

If you enjoyed this post, please share and become a subscriber! Be sure to confirm the subscription on the follow-up letter sent to your email address.

© 2014-2021 Judy Wright. All rights reserved. Photos, videos, and text may only be reproduced with the written consent of Judy Wright.