Warning: Reading this may lead to a fondness for dandelions.
What do these flowers have in common?
Zinnias

Sunflowers

Cosmos

Marigolds

Asters

Goldenrod

Dandelions

Artichokes
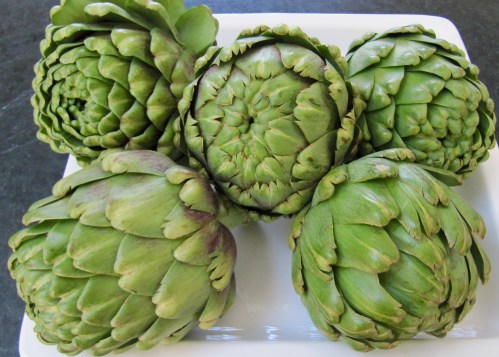
Artichokes?
I’ll give you a hint, the artichoke is a bud! If left to mature on the plant, it will produce hundreds of purple, narrow-tubed flowers cradled in one base.

These flowering plants are all part of the Asteraceae Family.
Plants are placed in families based on characteristics they share. These flower heads are all round and have a flat central disc. While each flower appears to be a single flower, all Asteraceae flowers are actually a composite of many small flowers, each with their own reproductive parts, packed densely into one receptacle.
The flowers in the center disc are called disc florets and those surrounding it are ray florets.

As beautiful as flowers are to us humans, flowers are trying to impress insects and birds. Pollination is the primary objective of a flower. Once pollination happens, the flower withers and dies. Pollination activates the fertilization of seeds, ensuring reproduction of the plant. Both ray and disc florets have all the necessary reproductive parts.

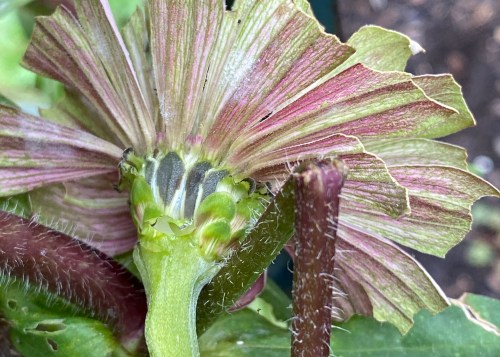
Another feature of plants in the Asteraceae family is their sepal-like leaves, called bracts, on the flower head’s underside. Bracts surround and protect the base of the plant where the seeds mature. They are arranged in either an overlapping or a linear pattern.


I took a few bracts off to see the seeds beneath — they are packed in there!
Rings of new disc florets emerge gradually in an orderly fashion from the disc’s outside perimeter to the center. A cone-shaped arrangement forms as the underlying seeds grow larger and require more space. This was a marvelous insight for me; one of the traits we love about zinnias is how long the flowers last. They last that long to ensure that every ovule (pre-seed) gets fertilized.

If you dissect a flower head, you can see the many seeds at various stages of maturation.

A good visual of a composite flower head is the sunflower.

Sunflowers are a bee magnet. We hear a lot about the benefits of growing “pollinator” plants in a garden. You need look no further than plants in the Asteraceae family for colorful flowers that attract insects.
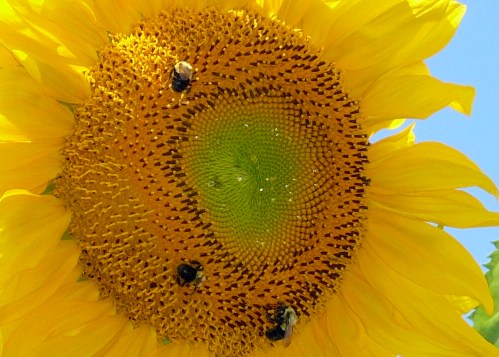
The end result is hundreds of sunflower seeds to eat and ensure reproduction.

Not all Asteraceae plants have both ray and disc florets. A few species have one or the other. Dandelions, for example, are comprised of ray florets only. With my new appreciation of flowering plants, I don’t think I will be as quick to pull dandelions out of my vegetable garden anymore. After all, my Sicilian immigrant grandmothers picked dandelion leaves to eat. The leaves are a good source for vitamin C. During early times, the cool-weather plants were grown in kitchen gardens for settlers to eat to prevent scurvy.

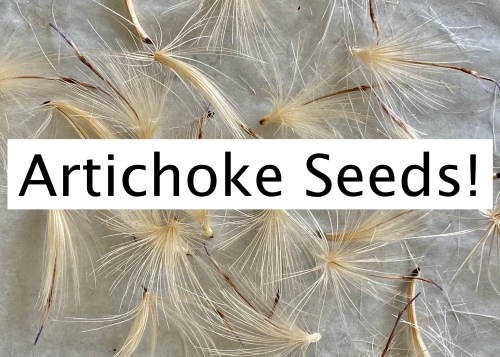
Artichokes are comprised of all disc florets. The bristles that make up the choke are actually hundreds of very immature flowers.

Knowing this, I forevermore will say a prayer of gratitude when I remove those less edible filaments from a stuffed artichoke. For without the choke, we would not get seeds for more artichokes! THAT would be a travesty.
Studying and photographing the unfolding reproductive cycle of flowers in my garden has been a source of joy, a saving grace, and a silver lining of diversion while living through this crazy pandemic. I am grateful to my mother for instilling in me a love of gardening and to Mother Nature for providing everything I need to grow food in my backyard. I hope to inspire others, most especially children, to experience the peace and thrill of planting a seed, watching it grow, and being a witness to the beauty of the natural world.
A moth imbibing in nectar.
If there are cool-weather plants such as asters, cosmos, chickory, or chrysanthemums in your yard, maybe cut one open and see for yourself!

I am grateful to my fellow naturalist and Instagram friend, Rose Marie Trapani, for sending me a flowering artichoke in the MAIL so I could dissect it. That’s a whole ‘nother story! You can follow Rose Marie @oursiciliantable on Instagram.

Related Posts
How to Build a 4 x 4 Raised Garden Bed
Winter Floral Arrangements Using Greenery from the Yard
Lemon Tree Very Pretty
Family Dirt
Edible Landscaping with Nashville Foodscapes
© 2014-2020 Judy Wright. All rights reserved. Photos, videos, and text may not be reproduced without the written consent of Judy Wright.
Follow Judy’s Chickens on Instagram and Pinterest @JudysChickens.
If you enjoyed this post, consider becoming a follower. Be sure to press “confirm” on the follow-up letter sent to your email address.