Roasted Butternut Squash, Brussels Sprouts, and Cranberries

I can not get enough of sweet, roasted chunks of butternut squash in the fall. I like to keep a whole cooked squash in the fridge to use in salads where the bright orange squash chunks take the place of tomatoes, or for use in warm, hearty grain salads made with onions, peppers, kale, and farro. Recently, I picked up a few butternut squashes and Brussels sprouts at a farmstand and roasted them with olive oil, salt, and garlic pepper.  When they came out of the oven, I sprinkled them with dried cranberries and a drizzle of sorghum syrup. The result was as colorful as it was yummy.
dsc_0481

Prepping butternut squash can be a challenge. The shell is hard to peel, and it feels like you are risking life and limb when you try to cut into one. I make a shudder/squirm movement everytime I make that first cut as I try to shake off the image of me lopping off one of my fingers. Here is a cooking tip, so none of us will ever have to face that scenario, microwave the squash for a few minutes to soften the shell and then peel and slice it. To do this, cut the tips off of each end of the squash, scoop out the seeds with a spoon, pierce the squash up and down its length with a fork, and microwave for three to five minutes depending on whether the squash is cold or at room temperature.
dsc_0689

The Recipe
Yield: makes 8-9 cups

Ingredients:
dsc_0396

2 pounds Brussels sprouts, stem trimmed and quartered
4 pounds butternut squash, peeled, seeded, and cubed
⅓ cup extra virgin olive oil
1 teaspoon sea salt
1 teaspoon McCormick’s Garlic Pepper
⅔ cup dried cranberries
2 heaping tablespoons sorghum syrup or honey

Instructions:
Preheat oven to 400º

Prep Brussels sprouts: wash, dry, trim the stem, and quarter lengthwise.
dsc_0414

Prep butternut squash. Microwave to soften shell and then peel, slice into discs, and dice into bite-sized pieces.
dsc_0432

Toss butternut squash, Brussels sprouts, olive oil, salt, and garlic pepper in a bowl. Spread into two parchment-lined, rimmed baking sheets.
dsc_0707

Roast for 20 minutes and then rotate pans on oven racks. Cook until done, about 20 minutes more. Remove pans from oven and immediately add about a third of a cup of cranberries and a heaping tablespoon of sorghum (or honey) to each pan. Stir together in a bowl and serve.
dsc_0722

Here it is served with Brooks’s recipe for Pork Tenderloin and Perfect Rice Every Time!

dsc_0494

Favorite Fall Desserts
Marion’s Crazy Good Pumpkin Bread with Chocolate Chips
Mom’s Pumpkin Pie
Mom’s Apple Pie with a Cheddar Streusel Topping
Mrs. Walker’s Cranberry Nut Pie
Pumpkin Cheesecake Pie
Pumpkin Bread Pudding with Caramel Sauce and Whipped Cream

Always check the website for the most current version of a recipe.

© 2014-2018 Judy Wright. All rights reserved. Photos and text may only be used with written consent.

Brooks’ Pork Tenderloin with her Amazing Marinade

The first time I tasted my friend Brooks’s kickass grilled pork tenderloin was at a funeral reception. Good friend that Brooks is to so many, she showed up at the reception with a platterful of sliced, perfectly cooked, and beautifully seasoned grilled pork tenderloins. A few days later, I called her for the recipe. I wrote the list of ingredients down on a piece of paper and then promptly misplaced it. That was ten years ago, 1/18/06. I know this because I wrote the date on the recipe. You would think someone meticulous enough to date scrap paper would have a decent method for saving it.

I thought of Brooks’s juicy and flavorful recipe every time I cooked pork using my pathetic but quick get-some-food-on-the-table-after-driving-boys-around- town- all-afternoon method of throwing two pork tenderloins into a bag with a salty steak marinade and roasting them at 400º until they were very well-done. In fact, the pork was so salty and dry; I quit making pork tenderloins all together. That was until Brooks’s recipe resurfaced a few weeks ago, and I learned how to cook pork to the right temperature.

dsc_0058

Let’s talk about how pork came to be the dry, well-done, other white meat and not the juicy, tender pink meat we enjoy now.

Trichinosis; It’s no longer a health epidemic 

I grew up in the 60s and 70s. My mother and her mother before her cooked pork until it was well-done. They did so because of the prevailing fear of an illness known as Trichinellosis, aka Trichinosis, which came from the ingestion of parasitic roundworms known as Trichinella spiralis. Trichinae were found most commonly in the muscle tissue of pigs and wild game. The U.S. Public Health Service started counting Trichinellosis incidents in the mid-1940s, around the time my mother was coming of age. At the time, 400-500 cases were reported each year. Because of my mother and grandmother’s respect for and fear of this malady, I knew the word Trichinosis as a ten-year-old. It translated into a disease that could surely kill you dead if you did not cook pork until it was well-done.

This all begs the question, Where were pigs picking up this parasite?  The answer was garbage. In the old days, many pigs were fed raw garbage on pig farms. In the 50s and 60s, food laws changed, and the government said the garbage needed to be cooked, and BTW, no more feeding raw animal carcasses to pigs, either. New farm hygiene protocols were established, and rodents, like rats and raccoons, were no longer allowed to access the pigpen.

Along with tighter control over farm hygiene, the government embarked on a massive publicity campaign instructing Americans to cook pork until it was well-done. The message stuck. In 1987, another ad campaign came along this time from the National Pork Board. It pitched pork as a white meat alternative to chicken and turkey. “Pork, the other white meat,” became the slogan. That slogan served to reinforce the concept of cooking pork until it was white and well-done.

Technique Time: Heat Transfer

So, if you don’t need to overcook pork anymore, to what internal temperature should you cook it to get a moist, light-pink center? The U.S.D.A says a minimum of 145º for all pork roasts and 160º for ground pork and patties. When using a meat thermometer, it should be inserted into the loin’s thickest part without touching any bones. Finally, let the meat rest for 5-10 minutes before serving. During this time, the meat’s internal temperature will rise by about five degrees and finish cooking the meat to 150º. Theoretically, you could cook the meat to 140º and let it finish off to 145º, but I tried that, and it was too pink and chewy for me.

This five-degree temperature increase that happens when cooked meat rests is due to the rules of heat transfer. The temperature on the surface of the meat when you pull it out of the oven is the same as the inside of the oven, in this case, 400º. If the room temperature is 70º, the heat on the pork’s surface has to go somewhere for the meat’s temperature to equilibrate with room temperature. Some of that heat is released into the room, and some goes back into the center of the meat, raising its internal temperature to 150º.

Back to the recipe

When I finally got the chance to make Brooks’s marinade, a full ten years later, it wasn’t as kick-assy as I remembered. I think I had mismeasured on the side of timidity when it came to gauging how much was a glug or dollop of this and that (Brooks’s measurement terms!). I called Brooks for clarification and to ask if I could blog the recipe. The conversation started like this, “Brooks, do you remember making pork tenderloins for Buck’s mother’s funeral TEN years ago? [Yes.] Are you still making them the same way?” [Yes.] To my surprise and amusement, she told me her newlywed son Alex had just called for the same recipe, so the ingredients were fresh on her mind. That, Dear Reader, is what keeper-recipes and motherful moments in cooking are all about.

Yield: 1¼ cups marinade (for 2-3 pounds of meat or two logs)

Ingredients:

dsc_0019

¼ cup extra virgin olive oil
¼ cup bourbon or rye
1 tablespoon “Tamari” Soy Sauce (a refined, more delicate, gluten-free soy)
1 tablespoon Worcestershire Sauce
2 slightly heaping tablespoons Dijon Mustard
1 teaspoon Beau Monde Seasoning (a salt and spice blend made by Spice Islands)
2 teaspoons cracked black pepper
10 peppercorns
Pinch of crushed red pepper
2 tablespoons brown sugar
5-8 large garlic cloves, sliced (or a heaping tablespoon of jarred, minced)
5-6 stems fresh thyme, coarsely chopped (I use lemon thyme)
Zest and juice of one lemon
A dollop of cognac (optional)
2-3 pounds (2 logs from one package) pork tenderloin, rinsed and patted dry

Instructions:

Remove pork tenderloins from the package. Rinse under cold water and pat dry.

Into a two-cup liquid measure, add olive oil to the ¼ cup mark, then add bourbon to the ½ cup mark, and then all the other ingredients: Tamari, Worcestershire, Dijon, Beau Monde, red and black peppers, peppercorns, brown sugar, garlic, the zest and juice of one lemon, and the thyme. Do not add salt. There is plenty of salt in the Tamari, Worcestershire, Dijon, and Beau Monde. Stir marinade with a fork, being sure to mix in the brown sugar that settles to the bottom.

dsc_0027

Mix pork and marinade together and allow to marinate in the refrigerator for eight hours or overnight. Turn it over and massage it every few hours.

dsc_0037

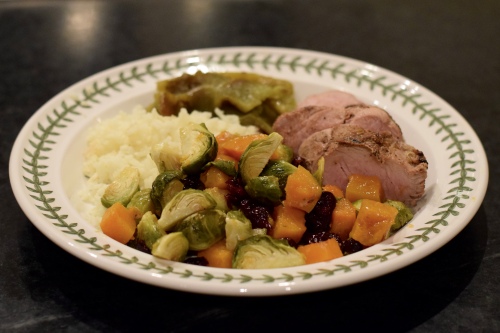
Cook in a preheated 400º oven or on the grill at the same temperature. Cook ten minutes on one side and turn over. Cook for another ten minutes, or until a meat thermometer inserted into the thickest part of the meat registers at least 145º. Let rest 5-10 minutes before serving. Our favorite degree of doneness was 148º, with a rise to 154º on the meat thermometer.

dsc_0254 dsc_0348

Even at 154º, the meat is still pink.

dsc_0363

If the meat is too salty, decrease the Tamari and Worcestershire Sauce to two teaspoons of each.

dsc_0072

Related Posts
Lemony Grilled Chicken Breasts
Mom’s Marinated and Grilled Lamb
Mom’s Roasted Lamb with Herb and Goat Cheese Topping
Lemony Grilled Chicken Breasts
Judy’s Mom’s Meatloaf
Brooks’s Pork Tenderloin Marinade

LET’S STAY CONNECTED!

Follow Judy’s Chickens on Instagram and Pinterest @JudysChickens.

Always check my blog for the latest version of a recipe.

If you enjoyed this post to become a follower, please be sure to press “confirm” on the follow-up letter that will be sent to your email address.

© 2014-2020 Judy Wright. All rights reserved. Photos, videos, and text may only be reproduced with the written consent of Judy Wright.

The Sheep of Nashville: The Chew Crew

Unlike my normal rambling openings, I’m going to cut to the chase.

This was the scene at Becca and Joe’s farm over the weekend. I stopped by their house because I heard the sheep from the Nashville Chew Crew were “working” in their yard and I wanted to show our out-of-town guests another side of Nashville. That Zach Richardson, founder, owner, and chief urban shepherd of Chew Crew was there showing his college buddies his flock in action was bonus.

The Chew Crews’ work around Nashville, “cleaning” fields of invasive plants in a sustainable way, is both novel and legendary having been well documented by The Tennessean and by my delightful and funny friends over at Mason-Dixon Knitting.

img_2877

What makes the story even better is to see a young man, a Nashvillian, use his gifts and talents to start a successful business doing good in the community. Zach went to MBA (Montgomery Bell Academy) for high school and UGA (University of Georgia) for undergraduate and graduate school where he earned a degree in Landscape Architecture. His area of expertise is targeted urban grazing, a sustainable method of clearing overgrown lots without using chemicals. Zach uses sheep to clear lots. Zach is adorable, spoken like a mother, I know.

img_2665

Just before Zach arrived, we were admiring the Chew Crew flock at work. Reba, their guard dog, was barking unhappily. It is her job to stay with the herd 24/7 and protect them, with the help of an electric fence, from predators. She saw us as predators.

Zach arrived with his border collie, Duggie. Duggie’s job is to gather and guide the herd of sheep when Zach gives commands.

In this photo, the sheep are waiting for their next command.

img_2679

These sheep are known as “hair” sheep. All sheep were originally hair sheep, but with domestication, their hair to wool ratio gradually changed to be more wool than hair, if that was the desired trait. You can read more about that at Sheep 101.

In this photo, you can see the fields already cleared by the sheep.

img_2686

When we were in New Zealand, I thought of another potential use for the Chew Crew: clearing the grass around vineyards.

img_8500

The Chew Crew is comprised of sixty sheep, all ewes (females) and one ram. All of the ewes are pregnant and due in January and February. There is lots of excitement ahead for the Chew Crew team.

img_2666

Related Posts
Eulogy for a Chicken
Winter Floral Arrangements Using Greenery from the Yard
WWMD? A Bucket of Spring Veggies as a Centerpiece
Family Dirt
Fall Planting Guide for Your Kitchen Garden
Spring Planting Guide for Your Kitchen Garden

Always check the website for the most current version of a recipe.

© 2014-2017 Judy Wright. All rights reserved. Photos and text may only be used with written consent.

Rotisserie Chicken Soup, Revisited

Ever since Costco started selling huge rotisserie chickens weighing in at 3-5 pounds each, I’ve been buying one a week just to have ready-to-eat food in the fridge.

dsc_0600

I’ll admit, we didn’t always get around to peeling off all the meat from the bones once we’ve gouged out the breast and thigh meat. Even with the best of intentions, the half-eaten carcass sometimes ended up in the trash. That always bothered me. That is, until I started throwing the carcass, skin, and gelatinous juice in the bottom of the container, into a storage bag, and putting all of it in the freezer to use at another time. My husband likes to take a meat mallet to this collection of meat, skin, and bones and flatten it out for better storage.

dsc_0490 dsc_0491 dsc_0492

The magic number of carcasses I can tolerate in the freezer is four and then it’s time to make room for other foods. And, four is as many as will fit in the 20-quart pot I use for making soup and tomato sauce.

One day last week, I posted a series of photos on Instagram as I prepared a pot of chicken broth using rotisserie chicken bones. A lot of people wanted to know how I made it.

A Day in the Life of a Pot of Rotisserie Chicken Bone Soup.

Timestamp: 6:27 a.m.
Put four chicken carcasses, carrots, celery, garlic, parsley, pepper, vinegar, and bay leaves in a 20-quart heavy-bottomed soup pot. Do not add salt. Fill pot with cold water just until ingredients are covered.  Bring water to a boil over medium-high heat, lower heat, and allow to simmer for five hours. The complete instructions are in this blog post:

dsc_0410

Timestamp: 11:38 a.m.
At lunch time, I turned the heat off and covered the pot and let it cool on the stovetop for a few hours.

img_2358

Timestamp: 4:00 p.m.
I strained the soup through a large colander; solids go in the trash because the meat is tasteless at this point, plus there are lots of tiny bones in the solids. I did pull out the tender carrots to nibble on. I was one cup short of eight quarts of broth, so I dribbled a cup of hot water over the solids to round out the number. Next, I took the pot of broth and ran it through a fine mesh sieve to get rid of the smallest bones.

img_2365

Timestamp: 6:49 p.m.
I poured 8-cups (two quarts) of broth into each of two containers that went into the freezer. The base of future meals!

dsc_0174

I used the other four quarts to make soup for our dinner and as “sick soup” for a friend. There’s a recipe in this post: Winter Cold Therapy: Sick Soup (or, Snowy Day Stew), Knitting and Coloring.

In last week’s version of this soup recipe, I used freshly picked collards and parsley from the garden, and potatoes, carrots, Italian stewed tomatoes, fire-roasted tomatoes (they give a little heat to the soup), leftover corn, and veal sausage from the depths of my freezer. I will use collards in my soup again; their texture, taste, and color hold up beautifully in soup. Don’t add the collards until the last few minutes of cooking.

.img_2368

Timestamp: 6:27 a.m. (today, two weeks later)
Took broth out of the freezer to make Lisa’s Award Winning Buffalo Chicken Chili, for dinner tonight. This is one of the most popular recipes on the blog.

lisa's chili

I’ll need to buy another rotisserie chicken for the meat portion of this recipe. The rotisserie chicken carcass salvage cycle begins again.

Related Posts
Rotisserie Chicken Soup, Revisited
Sick Soup, Sometimes Known as Snow Day Soup
Aunt Bridget’s Chicken Soup with Little Meatballs
Lisa’s Award Winning Buffalo Chicken Chili
Kelly’s Duck Stew
Bruce’s Turkey and Sausage Gumbo
Mrs. Lombard’s Portuguese Kale Soup (aka Caldo Verde)
Pasta e Fagioli, aka Pasta and Bean Soup
Roasted Butternut Squash Soup

LET’S STAY CONNECTED!

Follow my photos of vegetables growing, backyard chickens hanging out, and dinner preparations on Instagram at JudysChickens.

Never miss a post: sign up to become a follower of the Blog.

© 2014-2017 Judy Wright. All rights reserved. Photos and text may only be used with written consent.