New Year’s Day Fare: Collards, Pine Nuts and Cranberries

New Year’s Day is all about starting over. A clean slate. A fresh start. I’m game for all of it. Since moving South, I’ve learned you can improve your chances of having a healthy and prosperous year by eating three foods on this auspicious day: collard greens, black-eyed peas, and pork. The greens represent the color of money and thus, economic fortune, the peas (lentils, in the Italian tradition) represent coins, and plump pigs represent prosperity. Pigs also root forward with their noses representing progress. Compare that to chickens who walk backwards while scratching the dirt for food. No looking back. No chicken for New Year’s Day. I can get into all of it. I consider these foods to be charms for the easy life. But if I’m the one doing the cooking, I’m going to Italianize them; there will be olive oil and garlic used in the preparation of each of them.

To prepare black-eyed peas, check out this blog-favorite recipe, Marlin’s Black-Eyed Pea Salad.

blackeyedpeas11

To prepare the pork, try Brooks’s Pork Tenderloin.

dsc_0065

To prepare the leafy greens, try this recipe for collard greens sweetened with dried cranberries or golden raisins, and toasted pine nuts, all of it sautéed in olive oil and garlic.

About the Leafy Greens: Growing and Cooking Collards

Cooking with collards has been a new adventure for me. After seeing how beautifully they grow in the production gardens of The Nashville Food Project (where I frequently volunteer) and after cooking and serving them for years as a side dish for TNFP’s Meal Distribution Partners, I figured it was time to jump in and grow them myself. I’m so glad I did! They are like the Giving Tree of vegetables. Even as I write, on this cold winter morning, my crop of collards, unprotected from the winter elements, continues to happily produce greens. I’ve been picking from this same raised bed of collards since early October.

img_4078

Collards are a great crop for the first time gardener to grow, too; they are very forgiving. For eight months of the year, you will be rewarded with a continuous production of hearty greens that are great added to soups, or when used in a sautéed medley with other leafy greens.

Technique Tips

Chiffonading Leafy Greens:
Chiffonade is a cooking technique used to describe a way of cutting leafy greens into thin, pretty ribbons. The technique is mostly used to cut herbs like basil. I’ve adopted it for cutting all leafy greens for sautéing. To chiffonade, stack about five leaves, roll them together, and then cut through the stack. I use scissors for small, tender leaves, like basil and Swiss chard, and a knife for bulky leaves like kale and collards.

dsc_0995-1 dsc_0578

Toasted Pine Nuts
Add a single layer of pine nuts to a pan. Set heat to medium. Stir nuts about every 15 seconds. Cook for about two to three minutes, or until the nuts become fragrant and are lightly browned. When done, immediately remove nuts from pan to stop the cooking process. You can toast sesame seeds in the same way.

dsc_0604 dsc_0607

Ingredients:

dsc_0326

1½ pounds collard greens or Swiss chard (once trimmed will equal about 1 pound)
¼ cup pine nuts, toasted
⅓ cup olive oil
⅓ cup dried sweetened cranberries or golden raisins
6 cloves garlic (equals about 2 tablespoons, chopped)
½ teaspoon red pepper flakes
½ cup hot water
salt to taste

Mise en Place:

dsc_0588

Wash and dry collard greens. I let them air dry on dishtowels, patting the puddles of water that collect on top with another dish towel.

Remove the tough central rib from the leaves. To do this, fold the leaves in half and remove the rib with a scissor. Some people just tear the rib out.

dsc_0343

Chiffonade the greens.

dsc_0550

To cook the greens: Heat oil and garlic in a large six-quart sauté pan. Sauté for about one minute. Be careful not to brown the garlic as that could make it taste bitter. Add pine nuts, cranberries, and red pepper flakes. Stir.

dsc_0619

Add half the collards. Once they start to soften and shrink, add the rest. Add water and sauté for about 5-8 minutes until the collards are tender and the cranberries become plump.

dsc_0621

Add salt to taste: if the collards taste bland add more salt until the flavors pop.

dsc_0629

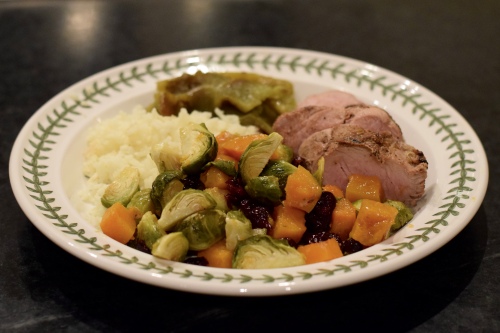
This is a side dish that is slightly bitter. We had it last night with lamb and parsley potatoes, and it was a delicious combination.

dsc_0643

When you go to set the table, consider looking in your yard for greenery for a centerpiece. My friend, Mary, said she was so inspired by Lou Ann working her design magic using greenery from my yard (check out Winter Floral Arrangements Using Greenery from the Yard ) that she went out in her yard and used greenery to create this quickie, yet elegant centerpiece.

img_4091

LET’S STAY CONNECTED!

Follow my photos of vegetables growing, backyard chickens hanging out, and dinner preparations on Instagram at JudysChickens.

Never miss a post: sign up to become a follower of the Blog.

© 2014-2019 Judy Wright. All rights reserved. Photos and text may only be used with written consent.


Auntie Martha’s Spicy Spinach

Recently, I sent each of my sons a text asking them to name three foods they HAD to have on Thanksgiving Day. All three responded with Auntie Martha’s Spicy Spinach. I don’t think a recipe can get a better recommendation than that. Meanwhile, my children, adults that they now are, have spoken; it’s time for me to get this time-honored family recipe up on the blog.

img_3072

My sister-in-law, Martha, and her siblings have been enjoying this side dish since they were children. My mother-in-law gave me the recipe when my husband and I married in 1983. I recently learned from Martha and her twin sister, Terry, that the original version was known as Spinach Madeleine, and first appeared in the popular Junior League of Baton Rouge cookbook, River Road Recipes: The Textbook of Louisiana Cooking in 1959. The recipe was created by a woman named Madeline Wright from South Louisiana when she got the idea to squeeze a tube of Kraft’s Jalapeno Cheese into a creamed spinach dish for a luncheon with her bridge friends. It was a hit. She submitted the recipe for the newly conceived River Road Recipes cookbook, and it was an even bigger hit. It has been showing up as an elegant side dish on Southern dining tables ever since.

The main ingredients are spinach and Velveeta cheese. What exactly is Velveeta?  Velveeta is a processed cheese product that when melted is velvety smooth. It was invented in 1923 while a cheese processing plant employees experimented with ways to use up pieces of cheese that broke off of cheese wheels while being trimmed. They mixed the cheese trimmings with whey, a byproduct from cheese-making, and Velveeta was born.

You will not find Velveeta in the refrigerated section of the grocery store. It took me many searches to figure this out. It is in the Dry Cheese section of the grocery store next to the tall, skinny green boxes of grated parmesan cheese.

img_3031

Yield: 3½ cups (very easily doubled or tripled)

Ingredients:
dsc_0934

20 ounces frozen chopped spinach, thawed and drained, save liquor
4 tablespoons butter
1 cup (4 ounces) onion, chopped
2 tablespoons all-purpose flour
½ cup milk
½ cup spinach liquor saved from drained spinach
1 teaspoon celery salt
¼ teaspoon ground black pepper
½ teaspoon garlic powder
1 teaspoon Worcestershire sauce
6 ounces Kraft Velveeta Jalapeno Cheese

Mise en Place:
dsc_0863

Instructions:

Preheat oven to 350º

Defrost spinach in a sieve over a bowl so you can save the liquid that drains out. It should amount to a half a cup. You could use three pounds of fresh spinach, sautéed in butter for the frozen spinach and substitute chicken broth for the spinach liquor.

dsc_0875

Melt butter in a saucepan. Add onions and sauté for 10 minutes over low heat. Stir in flour and cook for 2 more minutes.
dsc_0864 dsc_0872

Add milk, the spinach liquor, celery salt, pepper, garlic powder, and Worcestershire Sauce. Stir until blended. Add Velveeta chunks, and mix until melted.
dsc_0878 dsc_0884

Add spinach to pot and mix thoroughly. At this point, you could finish cooking by simmering on the stove for 15 minutes, or put it in a casserole and bake it later at 350º for about 30 minutes.
dsc_0885 dsc_0888

This recipe is easily made ahead of time and can be doubled or tripled. My mother-in-law always baked it with buttered bread crumbs or crumbled Cheez-Its on top.

dsc_0900

Today, I served the spicy spinach as a hot dip for a meeting and everyone loved it. Most of my guests were surprised to hear it was made with Velveeta!
dsc_0910

P.S. Tomorrow is my two-year blogiversary!!  Please sign up to follow my posts! So grateful to Ann Shayne and Kay Gardiner for inspiring me to blog, through their shining example over at Mason Dixon Knitting!

Other Thanksgiving Day Side Dishes We Love
Melissa’s Sweet Potato Casserole
Grandma’s Italian Fried Cauliflower
Roasted Butternut Squash, Brussels Sprouts and Cranberries
Amazingly Delicious Sautéed Carrots
Grandma’s Cranberry Chutney
Cauliflower Three Ways: Roasted, Blanched and Mashed

Favorite Thanksgiving Desserts
Mom’s Pumpkin Pie
Mom’s Apple Pie with a Cheddar Streusel Topping
Mrs. Walker’s Cranberry Nut Pie
Pumpkin Cheesecake Pie
Pumpkin Bread Pudding with Caramel Sauce and Whipped Cream
Marion’s Crazy Good Pumpkin Bread with Chocolate Chips

LET’S STAY CONNECTED!

Follow my photos of vegetables growing, backyard chickens hanging out, and dinner preparations on Instagram at JudysChickens.

Never miss a post: sign up to become a follower of the Blog.

© 2014-2018 Judy Wright. All rights reserved. Photos and text may only be used with written consent.

Roasted Butternut Squash, Brussels Sprouts, and Cranberries

I can not get enough of sweet, roasted chunks of butternut squash in the fall. I like to keep a whole cooked squash in the fridge to use in salads where the bright orange squash chunks take the place of tomatoes, or for use in warm, hearty grain salads made with onions, peppers, kale, and farro. Recently, I picked up a few butternut squashes and Brussels sprouts at a farmstand and roasted them with olive oil, salt, and garlic pepper.  When they came out of the oven, I sprinkled them with dried cranberries and a drizzle of sorghum syrup. The result was as colorful as it was yummy.
dsc_0481

Prepping butternut squash can be a challenge. The shell is hard to peel, and it feels like you are risking life and limb when you try to cut into one. I make a shudder/squirm movement everytime I make that first cut as I try to shake off the image of me lopping off one of my fingers. Here is a cooking tip, so none of us will ever have to face that scenario, microwave the squash for a few minutes to soften the shell and then peel and slice it. To do this, cut the tips off of each end of the squash, scoop out the seeds with a spoon, pierce the squash up and down its length with a fork, and microwave for three to five minutes depending on whether the squash is cold or at room temperature.
dsc_0689

The Recipe
Yield: makes 8-9 cups

Ingredients:
dsc_0396

2 pounds Brussels sprouts, stem trimmed and quartered
4 pounds butternut squash, peeled, seeded, and cubed
⅓ cup extra virgin olive oil
1 teaspoon sea salt
1 teaspoon McCormick’s Garlic Pepper
⅔ cup dried cranberries
2 heaping tablespoons sorghum syrup or honey

Instructions:
Preheat oven to 400º

Prep Brussels sprouts: wash, dry, trim the stem, and quarter lengthwise.
dsc_0414

Prep butternut squash. Microwave to soften shell and then peel, slice into discs, and dice into bite-sized pieces.
dsc_0432

Toss butternut squash, Brussels sprouts, olive oil, salt, and garlic pepper in a bowl. Spread into two parchment-lined, rimmed baking sheets.
dsc_0707

Roast for 20 minutes and then rotate pans on oven racks. Cook until done, about 20 minutes more. Remove pans from oven and immediately add about a third of a cup of cranberries and a heaping tablespoon of sorghum (or honey) to each pan. Stir together in a bowl and serve.
dsc_0722

Here it is served with Brooks’s recipe for Pork Tenderloin and Perfect Rice Every Time!

dsc_0494

Favorite Fall Desserts
Marion’s Crazy Good Pumpkin Bread with Chocolate Chips
Mom’s Pumpkin Pie
Mom’s Apple Pie with a Cheddar Streusel Topping
Mrs. Walker’s Cranberry Nut Pie
Pumpkin Cheesecake Pie
Pumpkin Bread Pudding with Caramel Sauce and Whipped Cream

Always check the website for the most current version of a recipe.

© 2014-2018 Judy Wright. All rights reserved. Photos and text may only be used with written consent.

Roasted Beet Salad

Last week, I returned home from a long vacation to a garden filled with produce and also lots of weeds.  As I cleaned each bed, I made one pile of weeds and withered plants, destined for the compost, and another pile of spring root vegetables.  After washing the veggies, I laid them out to dry. They begged for a photo. IMG_9567

All of these veggies were planted around March first. The “Scarlett Nantes” and “Calliope Blend” carrots and the “Hakurei” turnips were started from seed, the “Red Ace” and “Bull’s Blood” beets from seedlings, and the “Pontiac Red” and “Yukon Gold” potatoes, spring onions, and garlic from sets.

When you have such a sizable haul at one time, you need to divide and conquer in terms of prepping and cooking. I started with the beets because I love a beet salad and hadn’t prepared one yet this Spring.
DSC_0020

Ingredients:
fresh beets
@judyschickens Everyday Salad Dressing

Instructions:

Preheat oven to 400º

Wash and dry vegetables. Do not peel. Place on a sheet of parchment paper for easy clean up later. Cover with foil and roast for one hour, then turn oven off and let them stay in oven for 30 more minutes. If the beets are large, cut them in half before cooking.
Version 2 DSC_0664

When the beets are cool, peel with a paring knife.
DSC_0673

Slice the beets and toss with vinaigrette. You may wish to add a little salt. You can serve as is at room temperature as a side dish, or serve them chilled. Either way, they are delicious and a cinch to make. I love the color tone and pattern shifts in the different varieties of beets.
DSC_0694

Another way to eat them is in a cold salad. Here, I prepared a bed of arugula, and topped it with the marinated beets, crumbled goat cheese, and chopped walnuts, all of it tossed in a little more vinaigrette. Alternatively, you could use feta and sliced almonds.
DSC_0819

If the beet greens are fresh and perky,

DSC_0584

I cut them off the beet and sauté them in olive oil and minced fresh garlic for a few minutes.
DSC_0038

Before serving, while they are still in the pan, add salt and pepper and squeeze a little lemon juice. Dinner is served!

dsc_0074

Related Vegetable Dishes
String Bean Salad
Amazingly Delicious Sautéed Carrot
Cauliflower Three Ways: Roasted, Blanched and Mashed
Grapefruit and Greens: A Refreshing Winter Salad
Roasted Ratatouille

LET’S STAY CONNECTED!

Follow my photos of vegetables growing, backyard chickens hanging out, and dinner preparations on Instagram at JudysChickens.

Never miss a post: sign up to become a follower of the Blog.

© 2014-2017 Judy Wright. All rights reserved. Photos and text may only be used with written consent.

.