Unlike my normal rambling openings, I’m going to cut to the chase.
This was the scene at Becca and Joe’s farm over the weekend. I stopped by their house because I heard the sheep from the Nashville Chew Crewwere “working” in their yard and I wanted to show our out-of-town guests another side of Nashville. That Zach Richardson, founder, owner, and chief urban shepherd of Chew Crew was there showing his college buddies his flock in action was bonus.
The Chew Crews’ work around Nashville, “cleaning” fields of invasive plants in a sustainable way, is both novel and legendary having been well documented by The Tennessean and by my delightful and funny friends over at Mason-Dixon Knitting.
What makes the story even better is to see a young man, a Nashvillian, use his gifts and talents to start a successful business doing good in the community. Zach went to MBA (Montgomery Bell Academy) for high school and UGA (University of Georgia) for undergraduate and graduate school where he earned a degree in Landscape Architecture. His area of expertise is targeted urban grazing, a sustainable method of clearing overgrown lots without using chemicals. Zach uses sheep to clear lots. Zach is adorable, spoken like a mother, I know.
Just before Zach arrived, we were admiring the Chew Crew flock at work. Reba, their guard dog, was barking unhappily. It is her job to stay with the herd 24/7 and protect them, with the help of an electric fence, from predators. She saw us as predators.
Zach arrived with his border collie, Duggie. Duggie’s job is to gather and guide the herd of sheep when Zach gives commands.
In this photo, the sheep are waiting for their next command.
These sheep are known as “hair” sheep. All sheep were originally hair sheep, but with domestication, their hair to wool ratio gradually changed to be more wool than hair, if that was the desired trait. You can read more about that at Sheep 101.
In this photo, you can see the fields already cleared by the sheep.
When we were in New Zealand, I thought of another potential use for the Chew Crew: clearing the grass around vineyards.
The Chew Crew is comprised of sixty sheep, all ewes (females) and one ram. All of the ewes are pregnant and due in January and February. There is lots of excitement ahead for the Chew Crew team.
It was the smoking barns that first drew me down the rabbit hole of learning about the tobacco plant, Nicotiana. I had no idea the billows of smoke that hovered around these barns came from a curing process that has been used to preserve tobacco leaves for hundreds of years.
In retrospect, I’m so glad I didn’t call the fire department! My friends who grew up on farms with smoking tobacco barns said strangers were always coming to their door to inform them their barns were on fire.
These alluring barns with their hovering fog-like smoke are everywhere in the agriculturally rich fields of Kentucky.
It wasn’t until I opened the door of this historical barn that I became enamored with the mottled leaves hanging on racks that rested on a series of ever-rising rafters and the low-burning fire beneath.
The architecture of the barns, the tantalizing smell of the drying leaves, and the agricultural history associated with the growth and harvest of tobacco have captivated my attention ever since.
The Tobacco Barns
There are two types of barns built for curing tobacco in Kentucky: those specifically constructed for air-curing and those built for wood-firing. Which barn one uses depends on how the tobacco will ultimately be finished. Flavored tobaccos like those used in pipe blends, snuff and tobacco chew, are smoke or fire-cured in barns that are tightly sealed and have smokestacks. Cigarette and cigar blends, which use a higher grade tobacco known locally as Burley, are simply air-cured in barns that allow for a cross breeze.
Air-Curing Barns
Tobacco that is to be air-cured goes into barns built for air-circulation with small open spaces between the wall slats that allow air to blow through.
They do not have smokestacks.
Here is another one. This air-curing style barn is my favorite.
Notice the light coming in through the open spaces in the walls. And the rafters. Notice the rafters. So beautiful! When I am standing in this barn, I feel like I am standing in a church.
Here is a photo of the same barn filled to the ceiling with tobacco. There are seven levels of rafters to hang the tobacco.
When the wind is blowing, the sound of the leaves rustling is lovely. Add to that the smell of the tobacco and the whole thing is intoxicating. Take a look at this video.
Error
This video doesn’t exist
Wood-firing Barns
There are a few telltale signs that a roadside barn is built for wood-firing. Besides the smokestacks, there is always a stack of wood,
and a hill of sawdust near the barn, which are used to build and keep a low-burning fire smoldering on the floor of the barn for weeks.
Here is the interior of a historic wood-burning barn at The Land Between the Lakes Homeplace. The smoldering fire is built in ditches on the ground.
Compare that to the interior of a commercial wood-burning barn. Same concept, but in this barn, there is about six inches of firewood covered by a full 18 inches of sawdust.
To create the low-burning fire, the farmer makes a series of evenly spaced holes in each row of sawdust for the entire length of the barn. He then stuffs straw in each hole and pours a little diesel fuel into the holes. Once he ignites the straw, it burns and connects with the wood stack underneath. The fire gently smolders for about a week. At this particular barn, the entire process is repeated later for another week to finish off the dehydration and smoke-curing process. I’ve read that the goal of curing tobacco is to get the moisture count of the leaves down to twenty percent so they can be transported for finishing without crumbling.
Growing Tobacco
I haven’t witnessed how the seeds are started, but a farmer told me they are started in seed trays and planted in the ground in May.
In July, the farmers “top” the plants, removing the flowering seed heads to encourage more robust leaf production. Any new leaves that try to grow are individually suckered off by farmers, or they are sprayed to halt new growth.
That brings us to late August. The plants turn yellow indicating they have ripened and are ready for harvest.
You can read up on the different varieties of light and dark tobacco leaves, and the sugar content of the leaves here.
The Harvest
The farmers begin the harvest process in late August or early September depending on the weather and ripeness of the tobacco leaves.
Here are the tools of the trade for harvest: a tobacco knife, a tobacco spear and a rack of tobacco sticks.
First, the stalks are chopped down at ground level with a tobacco knife. Meanwhile, someone goes up and down the rows of tobacco plants and places a tobacco harvesting stick on the ground about every six feet.
Next, a farmer comes through, picks up a stalk and pierces it with a black tobacco spear placed over a tobacco stick. The farmer threads up to six stalks onto each stick and then moves onto another stick. This process is called “sticking.”
This farmer kindly allowed me to take a video of him sticking. It follows.
Error
This video doesn’t exist
The many speared piles look like a row of small haystacks when seen in a field.
Curing
Next, the stalk-laden sticks are gathered and laid across the top bars of a metal tobacco transporter.
The transporters are pulled by a tractor to the curing barn where the racks of stalks (on the sticks) are hauled up into the rafters of a barn for drying.
I thought for sure the farmers had some sort of lifting machine to do the job of raising the sticks up to the ceiling, however, they do not. It is all done by hand.
Another farmer named Ernesto graciously showed me how he and his team of men passed the sticks, loaded with stalks, up to the top row of rafters, bucket-brigade style. I love this video. It shows the hard work that goes into climbing up the rafters, passing the sticks up, and ultimately hanging the tobacco stalks to dry.
Error
This video doesn’t exist
I am so grateful to the migrant farmers who allowed me to film them at what is a very hard job done in very hot weather.
I have enjoyed learning about the harvest and curing of tobacco. I would love to hear your stories, so please feel free to include a comment if you ever worked or lived on a tobacco farm and can shed more light on the practice of raising and harvesting tobacco.
LET’S STAY CONNECTED!
Follow my photos of vegetables growing, backyard chickens hanging out, and dinner preparations on Instagram and Pinterest at JudysChickens.
Never miss a post: sign up to become a follower of the Blog.
Ten years ago we took our children to Sicily to explore my family’s roots. One daytrip found us driving up a scenic mountain road looking for the small town of Isnello, home of my great-grandmother on my father’s side. The winding country road was slow-going and more than once we had to wait for a herd of goats to pass. Along the way, we passed something very unusual — a grove of nude trees.
As we continued along the road, we saw more nude trees and stacks of bark on the ground.
We pulled over to investigate and suddenly realized we were looking at a cork tree farm. Cork oaks, Quercus suber, to be exact. We were all so excited to figure this out; it seemed like the light bulb went off in all of our heads at the same time. Where corks came from was just not one of those questions any of us had ever considered, and now the question and the answer were presented to us at the same moment. That was memorable.
Slabs of cork bark are harvested from cork oaks every nine to twelve years. The trees, which often live for 250-300 years, need to be 25 years old before their cork can be harvested. It is a good example of a renewable resource. The harvest from one cork tree can be used to make 4000 corks.
Here is a video that shows the production of corks from harvest to bottle cap. Section 4:45 on the timeline shows a drill punching out corks from a strip of bark. If you look closely at the corks, you can see the age lines of the bark, generally 9-12 years of tree growth.
I was a collector of wine corks long before seeing the cork oak grove simply because I loved the cork’s texture and graphics. Since visiting the grove, I’ve become incapable of throwing away a cork. I am that person who slips wine corks into her purse at dinner parties.
A year after our trip, I was in the middle of a kitchen renovation when the idea hit me to make a wall-sized corkboard on the wall above my cookbook shelves.
My husband built the frame for the bulletin board using a very thin sheet of plywood for the backing and pine trim for the frame. I used a polyurethane stain as a finish.
The board is anchored into the wall studs with four screws, each of which is covered with corks that have pink nail polish painted on them so we can locate the screws should we ever want to remove the corkboard.
I made another corkboard for the space above my sewing machine nook.
I did not frame it. Instead, I custom built it to fit into the cabinet space that surrounds it. The corks are glued onto thin plyboard which is fastened to the wall with screws.
Over the summer, I made four corkboards, one for each of the homes my sons and niece were moving into. They all wanted black frames. Each is two feet by three feet and uses about 500 corks. The frame and backboard weigh five pounds, and the corks weigh about six pounds. Before you take on this project, you’ll need to save a lot of corks.
My husband built the frames, and another relative, Uncle Steve, who was visiting, puttied, sanded, and painted the frames. After I posted a plea for corks on Facebook, friends and family, near and far, either mailed boxes of corks to me or dropped them off at my front door. I am so grateful to the people who shared their stash with me.
Supplies You Will Need:
About 500 wooden corks (weighs about six pounds)
Plywood backing
Two six-inch strips of wood trim to build the frame (see photo)
Miter box and saw
Hot glue gun with a refill package of long glue strips
Cutting board and knife for trimming corks
Yardstick and pen to draw guidelines on the plyboard
Lightweight wood filler
Sanding block (fine)
Primer, spray-on works fine
Paint- I used one with a satin finish
Small paintbrush
Two eyelet screws
40-pound picture hanging wire
Instructions:
Buying the Backing and Frame Materials
To keep the weight down on the finished product, I use the thinnest sheet of plywood backing I could find. I usually ask the salesmen at Home Depot to cut the plywood down to the size I need.
On a slow day, I can often get him to miter-cut the trim pieces for me, too.
If we do the trim cuts at home, I add an extra length of trim in case we mess up on our cuts.
Building the Frame
My husband took the two six-foot long trim strips and used a miter-block to cut them down to the proper size which was previously measured to fit around the plywood exactly.
He then used wood glue to attach the molding to the back board. He used clamps to keep the trim in place while it dried. You could also use a nail-gun to keep the frame in place, but you will have to come back and fill in the nail holes with putty.
Putting a Finish on the Frame
First use wood putty to fill in the crevices of the mitered corners. Allow to dry and then lightly sand with a fine block sander.
Apply a coat of white primer paint. Primer raises the fibers on wood, so once it is dry, you will need to sand the surface again. Wipe away the dust with a cloth.
Use a paint brush to apply the paint. I tried using a can of spray paint, but I didn’t like the drip marks it left so I switched to regular paint. Allow paint to dry overnight.
Applying the Corks
Draw horizontal guidelines across the plyboard, approximately every three inches, to help you lay out even rows of corks.
Start at the bottom of the board, two corks vertical followed by two corks horizontal. Choose corks that are the same length for each of the twosomes. When you get to the end of the row, you may have to use a knife to trim corks to make them fit.
I lay out an entire row of corks first and then come back with a hot glue gun to glue them into place. The corks should fit snuggly.
I place all the corks with their graphics and words readable from the same direction, both vertically and horizontally. Thus, whether you choose to hang the finished board vertically or horizontally, the corks will all face the same direction.
Continue in this pattern all the way to the top of the plyboard.
I usually need to do some finagling to make the last three rows of corks fit nicely into the frame. It is definitely like a puzzle at the end. This is not the time to be a perfectionist. Once you start pinning things on your finished bulletin board, nobody will notice what you did to make the corks fit.
Installing the Hanging Wire
You will need two small eyelet screw and 40-pound picture hanging wire.
Lay the frame face down. Mark the frame on each side with a pencil one-fourth of the way down from the top corners. That’s about six inches down.
Make a small pilot hole over the pencil mark using a hammer and a nail one size smaller than your eyelet screw.
Screw the eyelet hooks into the pilot holes. The eyelet holes should face each other when properly installed.
Wrap the hanging wire through the eyelet hole a couple of times before running the wire across to the other eyelet screw.
More Ideas:
My friend, Libba, sent me photos of the cork wall on the bar in her home. I love the design! It looks like it was sprayed with a coat of polyurethane.
Her cork board inspired me to make this one; my all-time favorite board.
I used large champagne corks for the round pieces.
I made it for a wall in my office/studio.
Thank you to all my friends who left corks at my door and who took time to mail their stashes to me: Wayne, Maribeth & Michael, Albie and Sara, Bill & Kim, Frances, Beth, Millie, Caroline, and the people I’ve missed. It’s nice to know I am not the only one who can’t throw away a cork.
Knitting, cooking, and crafts — my inspiration for all of it came from my mother.
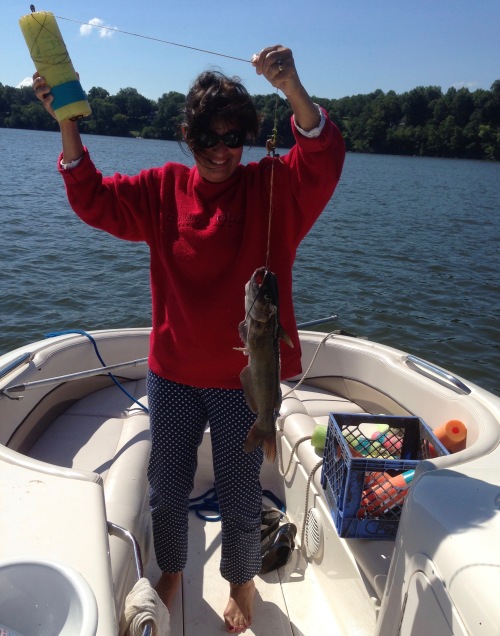
The first time I went to Lake Barkley, I sat on the edge of the lake in the quiet of the morning and watched an energetic family motorboat from one buoy to another, pulling in fish and laughing as they did so. I had never seen this way of catching fish, but I was hopeful this Rockwellian moment could one day be a part of my future. Indeed, being who I am, I went ahead and imagined my husband driving a boat full of grandchildren …
Later in the day, we met the family who had been out in the boat, our new neighbors, Pat and Dave Malone. They explained how to “jug” fish and showed us their morning catch. We were hooked. My recent enthusiasm for catfishing ensured a trip later in the day to Walmart to buy supplies. My husband’s curiosity and DIY nature ensured he would have the noodle lines rigged and set that evening. Luck secured a catch the following day.
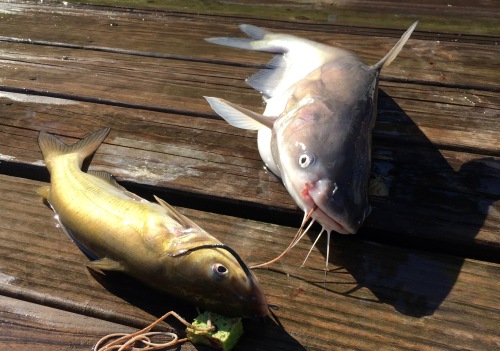
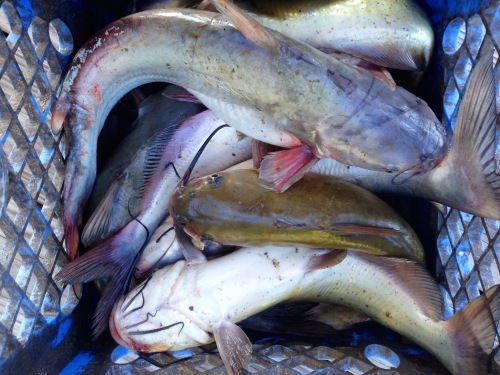
The most common types of catfish in Lake Barkley are the scaleless Channel Catfish and the Blue Catfish. When the Channel catfish are young, their skin is greenish-gray with black spots. The spots go away as they age, and their skin turns gray. The fish on the right with a white belly is called a Blue catfish. The one on the left is a Channel catfish (thanks, Bruce!).
Here are some facts about catfish that might help should you decide to go noodle fishing:
Catfish are nocturnal bottom feeders.
Their peak activity and eating time is from dusk to midnight.
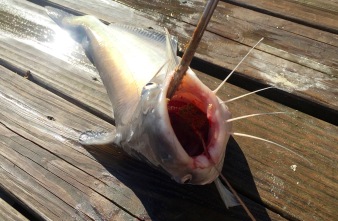
They have cat-like whiskers called barbels (that do notsting).
Their barbels are receptors for taste, smell, touch, and wake-tracking prey.
Their razor-sharp dorsal and side fins can prick you.
Their flat heads make it easier to skim the lake floor for food.
They’ll attempt to eat anything, dead or alive, so this, the most foul-smelling bait on earth, is an excellent choice to lure them in.
Catfish do not have teeth. Instead, they use suction to pull food into their mouths as they swim.
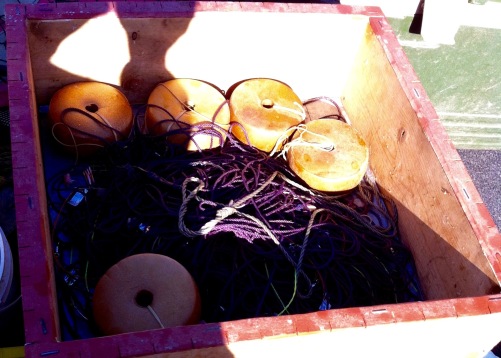
I’ve seen people catch catfish in two ways:.One method is to use a long trotline weighted down with evenly spaced weights and large hooks. This one had about 100 weights and hooks.
The other method is known as noodle fishing.
Here is how to noodlefish: In the late afternoon, place your premade collection of baited noodles in shallow water. The following day, go out and pull each noodle in. We usually catch two or three fish out of the twelve noodles we set. Sometimes, we have to search for the noodles if the wind, or a strong fish, has dragged one away. The hunt for a noodle that has drifted across the lake is part of the adventure.
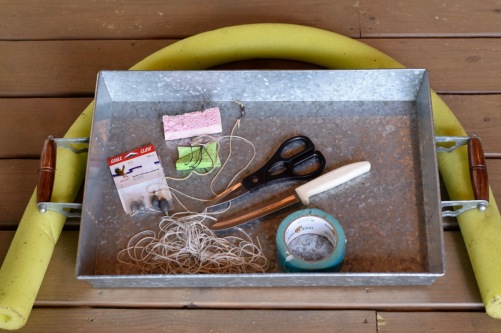
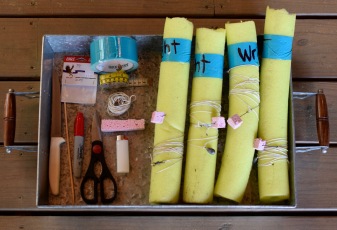
How to rig a catfish noodle (makes 4):
Supplies:
1 four-foot long yellow or orange swim noodle and a knife to cut it into twelve-inch segments.
duct tape, scissors, and a Sharpie marker
40 feet of thin, braided, polyester string and a lighter to burn and seal the ends
1 tape measure to measure the lengths of string
4 large fishing hooks
4 half-ounce casting sinkers (weights)
1 dry sponge
1 skewer to make holes in the noodle
1 jar of stinky catfish bait (we use Sonny’s Super Sticky Channel Cat Bait)
Instructions:
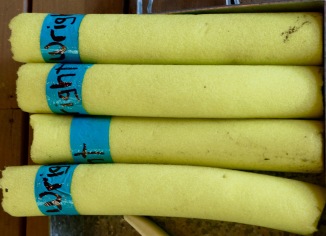
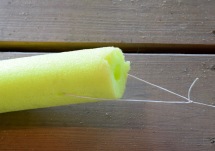
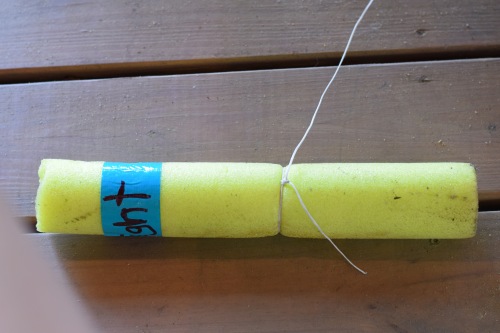
Cut a swimming noodle into four or five equal parts. Use bright yellow or orange noodles to spot them bobbing in the water from afar. Use colorful duct tape to make a stripe on one end to better distinguish your noodle stash from others. Or, just write on the noodle!
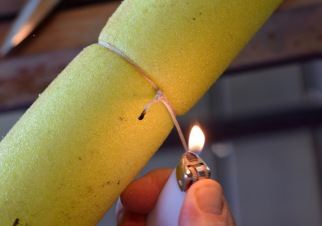
Cut ten-foot-long lengths of string, one for each noodle. Use a lighter to melt and seal each end of string so it won’t unravel.
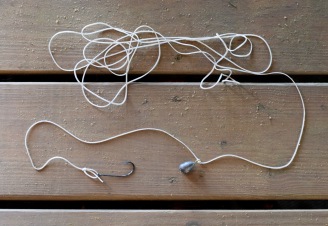
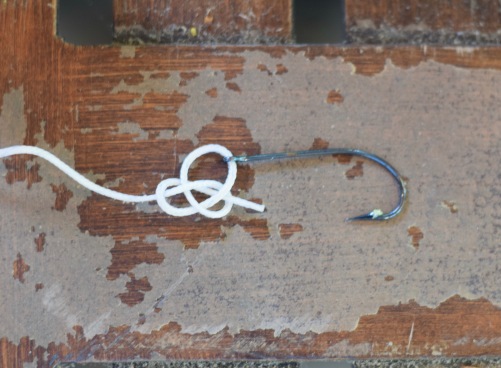
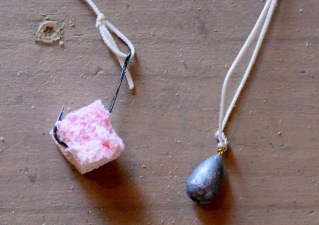
On one end, attach a giant fish hook. Use a bowline knot to secure the attachment.
About 12 inches from the hook, attach a weight by making a loop with the string, running the loop through the weight’s clasp hole, and then pulling the weight through the loop of string. Next, tie a knot to secure the weight in place.
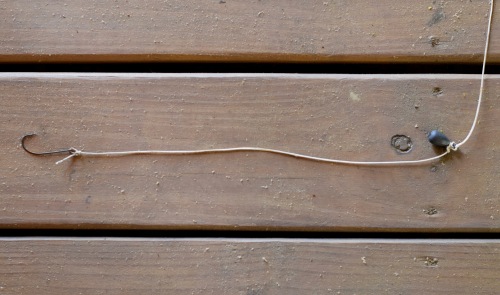
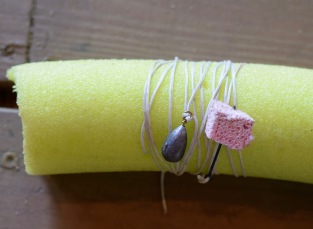
The finished hook and sinker should look like this:
Now, for the other end of the string: Using the pointy end of a skewer, make a hole through the noodle as shown. Make a little slit on the skewer’s flat end with the edge of a scissor. Slide the string through the slit, thus creating a guide so you can run the string through the small hole. Knot the string around the noodle, as shown.
Alternatively, you could just attach the string to the tube this way:
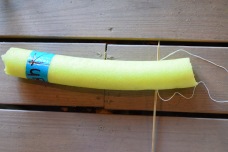
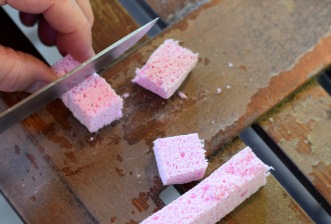
Cut a sponge into little squares. Make extra squares to store in your tackle box. Secure one sponge on each hook.
With the hook and sinker attached, wind the string around the noodle, tuck the hook into the styrofoam for safety, and store until ready to fish.
How to noodle fish:
Before setting your noodles in the water, dip the hook with its dry sponge into the gooey catfish bait. Throw the baited noodle line into the water. Repeat until all the noodles are baited and tossed into the water. Invite others (such as guests) to do this stinky baiting job whenever possible. Thanks, Rex!
Throw each baited noodle into shallow water that is about eight feet deep. Since catfish are bottom feeders, you want the weighted hook to sink to their level.
The next day, get up early and check your noodles for fish. We use a mooring hook to grab the noodles. The noodles sometimes drift.,
:
Ta Da!
How the pros do it
Compare our single hook method to how the pros do it … Early one summer morning, while we were out pulling in our scrappy noodle lines, we saw a husband and wife team hauling in one fish after another from a “trotline.” Mouths agape, we took our boat over to watch and visit.
The couple, experienced fishermen, had an interesting way of keeping their fish fresh. They had a long, thin, wooden tub in the center of their boat with a gasoline-powered engine that kept the water churning.
We noticed the couple throwing the small fish (which looked huge to us) back into the water. They must have seen how impressed we were with what they called small because ten minutes later, they waved us over and gave us a bucketful of their “rejects.” We gushed with thanks.
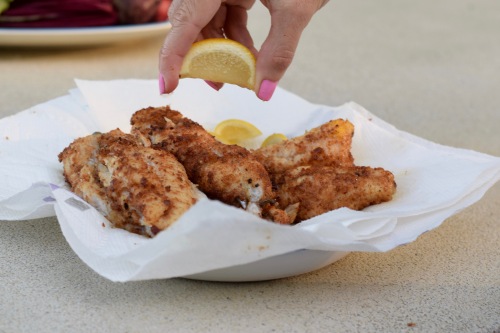
How We Cook Catfish
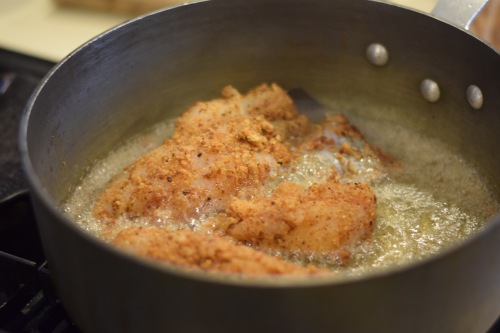
One weekend, my husband and visiting friends, Mary and Ed Carter, showed us how they prepare catfish. It’s become our traditional way of cooking it now. This recipe makes enough for four people when used as an appetizer. The fish was light, flaky, and delicious.
4 6-ounce catfish fillets (approximately)
1 cup garlic croutons, crushed
1 tablespoon Tony Chachere’s Creole Original Seasoning or seasoned salt
1 teaspoon lemon garlic pepper
canola oil
lemon slices for garnish
In a ziplock bag, crush the croutons into large crumbs. Add the fish and remaining seasonings. Gently toss until fillets are well coated.
Meanwhile, heat canola oil in a cast iron skillet (about 1 inch deep). When a drop of water sizzles in the oil, it is ready for the fish. Gently lay the fillets in the hot oil. When lightly browned and flakey, flip over and cook the other side. Serve hot.
Squeeze with lemon juice before serving.
Enjoy! Here is our Southern Living magazine-style photo moment.