Roasted Patty Pan Squash

Patty Pan, Scalloped, and Flying Saucer are all perfect names for this whimsical variety of summer squash known for its ornately scalloped edges and shades of color ranging from pale yellow, to variegated yellow and green, to dark green. The color of this particular variety, called “Flying Saucer,” is temperature dependent — it will turn green when temps become very hot in the summer.

Patty Pans are kin to other varieties of summer squash such as zucchini, yellow crooknecks, and “Cubes of Butter” all of which ripen between June and September.

Summer squashes are thin-skinned with tender interiors. They can be eaten raw with their peel intact. Compare that to mature winter squashes such as butternutacorn, spaghetti, and pumpkin, with their hard outer skins, firm interior flesh, and fibrous seeds. They need a little more attention when cooked, but man, are they good, too!!


How to Grow Patty Pans

I grew these patty pans with my other summer squashes in a 4 x 13 foot raised bed. I planted the seeds on April 3rd and started harvesting around June 10th. Here is how the bed looked on April 8th, (the day they germinated), May 10th, and on June 10th when I started harvesting. One plant will bear two to three successive harvests before dying off.

It is best to pick patty pans when they are less than 4 inches in diameter.

How to Cook Roasted Patty Pan Squash (and other varieties of summer squash)

For roasting most vegetables, I think Mary Kane’s (aka Mom’s) trinity of McCormick’s Garlic Pepper, fine sea salt, and extra-virgin olive oil is a surefire way to a successful dish.

My mother was a fantastic cook whose nightly dinners were legendary. A big tip was to keep dinner simple. Basically, she prepared a protein, a starch and a vegetable or two every night. There were no fancy sauces or ingredients for which she had to spend hours searching. Her daily ten-mile drive to Walkers Roadside Stand, along the bucolic Sakonnet River in Little Compton, R.I. was more of a peaceful escape than a trip to hunt down ingredients.

IMG_0142

She learned early on that roasting vegetables enhanced their natural goodness, and that includes sweetness. I, in turn, learned by cooking by her side most of my life.

PC310065

Ingredients

2 pounds Patty Pan squash
2 tablespoons extra virgin olive oil
¾ teaspoon fine sea salt (or, to taste)
¾ teaspoon garlic pepper

Mise en Place

Instructions

Preheat oven to 400º.

Wash and dry veggies and cut off stems. Slice each squash into three segments.

Place slices in a bowl and toss with Mary Kane’s Trinity.

Arrange slices in a single layer in a large parchment-lined roasting pan.

Roast for 40-45 minutes. Flip over halfway if you want both sides browned. I don’t bother with this extra step.

I love the unique squashy taste and denseness of these Patty Pan slices.

Serve squash with:
Cooking Dinner in an Unfocused Way, or Ode to the Rice Cooker
Easy Roasted Salmon with Olive Oil and Garlic Pepperor
Lemony Grilled Chicken Breast
Very Berry Clafoutis or Ellen’s Most Moist Zucchini Bread for dessert

Always check the website for the most current version of a recipe.

© 2014-2017 Judy Wright. All rights reserved. Photos and text may only be used with written consent.

Meera’s Arugula, Feta, Dried Cherry (or Cranberry) Salad with Toasted Almonds

If you need to bring a side or a salad to a Labor Day Weekend fête, I’ve got just the one.

This salad is quick, colorful, and delicious, with the added bonus that it could easily become dinner with the addition of sliced grilled chicken. The first time I had it, on the weekend of the eclipse, my good friend, and relative, Meera Ballal, brought all the ingredients over in a Trader Joe’s grocery sack. By the time the chicken was grilled, the salad was assembled and on the table. Everyone loved it!

Yield: Serves 10-12 as a side dish

Ingredients
2  7-ounce bags arugula, (have a third on standby to perk up the salad)
1  8-ounce package dried, tart Montmorency cherries
1  6-ounce package crumbled feta cheese (sometimes Meera uses 2 containers)
1  8-ounce package raw, sliced almonds
3 tablespoons extra virgin olive oil
Judy’s Chickens Every Day Salad Dressing or TJ’s Balsamic Vinaigrette
Lemony Grilled Chicken Breasts  (optional)

Mise en Place

Instructions

Put the arugula, feta, and dried cherries in an extra-large mixing bowl that leaves plenty of room for tossing the ingredients together.

Next, toast the almonds in olive oil to enhance their nutty flavor. To do so, pour olive oil into a warmed medium-sized sauté pan. Add almonds and mix to coat. Sauté over medium-low heat for about two minutes. Meera told me to stir the nuts almost constantly because they go from toasted to burned, quickly. She said, with her infectious laugh, “This is not the time to multitask in the kitchen.” She was right about that. The nuts went from creamy white to brown, to dark brown around the edges of the pan in the blink of an eye. When they start to brown, dump them immediately into a small bowl to stop the cooking process. Keep the nuts warm in a separate bowl until dinner time.


Just before serving, add the nuts and salad dressing. I like to use my own homemade salad dressing  @judyschickens Everyday Salad Dressing.  I sprinkle a little white balsamic vinegar over the greens for added “bite” before tossing. The greens collapse quickly, so don’t add dressing until ready to serve.

For the grilled chicken, try my chicken marinade recipe, Lemony Thyme Grilled Chicken Breasts.  The lemon and thyme in the chicken enhance the flavor of the salad.

The cost of this salad? $17.14 if you use your own salad dressing.

For a fun Labor day activity, check out Catfishing with Noodles on Lake Barkley, Kentucky!

Always check the website for the most current version of a recipe. Thanks!

© 2014-2017 Judy Wright. All rights reserved. Photos and text may only be used with written consent.

Tomato Pie for a Crowd

fullsizeoutput_cc2b

Tomato Pie, like Pimiento Cheese, is one of many fabulous culinary treasures of the South. Basic tomato pies combine the goodness of ripe tomatoes, with melted cheese and a crunchy pie crust. If you add to that bacon, onions, basil, and cheese in the crust, now you’re talking about a DELUXE and savory tomato pie.

fullsizeoutput_cc29

Like for pimiento cheese, there are many ways to make a tomato pie. Some have the cheese on the bottom, and the tomatoes on top and some have it reversed.


The key to making a great tomato pie, in fact, the only must-do after you gather colorful heirloom tomatoes (see Tomatoes: The Crown Jewels of the Summer Kitchen Garden)


is to core, slice, salt, and drain the tomatoes to divest them of their watery juice and thereby prevent a soupy, soggy, messy pie.

My favorite way to make tomato pie is with a crunchy cheese crust and tomatoes that are piled high and deep on top.

This pie’s problems are that there is never enough to go around, definitely not enough for seconds, and too many calories in the crust for an “everyday” meal. To fix these problems, I first tried to develop a larger pie (lasagna pan-sized) without a crust. However, I found the soft texture of the tomatoes and melted cheese demanded a crunchy crust, so I added the crust back, but only on the bottom, and loaded the dough with nutty parmesan cheese. My family loved it.

Yield: Makes one 9 x 13-inch pan, 10-12 servings

Pie Crust Ingredients

¼ cup cornmeal
1 cup all-purpose flour
¼ teaspoon fine sea salt
½ cup grated parmesan, somewhat packed
1 stick (½ cup) very cold or frozen butter, sliced into many pieces
4 tablespoons ice-cold water

Tomato Filling Ingredients

5 pounds ripe heirloom tomatoes, sliced ¼ inch thick
1 teaspoon sea salt
12 ounces unflavored bacon, about 12 strips
1 pound sweet onion (red or yellow), sliced thinly
2 tablespoons olive oil
½ cup homemade breadcrumbs
20 large or 30 medium-large leaves basil, chiffonade
½ cup mayonnaise (not the low-fat, sweet, or whipped varieties)
1 pound mozzarella cheese, shredded
½ cup parmesan cheese, shredded

Game Plan
I’m not going to lie about the amount of prep work needed for this recipe; this pie takes time. I streamlined the process by buying already shredded mozzarella and parmesan cheese and by using homemade breadcrumbs from a stash in the freezer. As a time-saver, you could forego the homemade cheese crust and use a single layer, pre-made roll of uncooked dough, reshaped to fit in a 9 x 13 pan. Or, you could make the cheese crust version the day before and store it uncooked in the fridge.

1) Prep Mise en Place for Pie Filling

Slice tomatoes about ⅓ inch thick. Place in a colander, add 1 teaspoon of salt and gently mix to distribute the salt. Place a weighted object on top of the tomatoes to help squeeze out the juice. I put a collection bowl under the colander to capture the juice and save for something else (like soup broth). Gently stir and squeeze the tomatoes every 5 or 10 minutes. Let them continue to drain while you finish the prep work.


Chop the bacon into two-inch pieces. Sauté until cooked, then drain the fat, and pat the bacon dry with paper towels.

 Thinly slice the onions. Salt very lightly with a pinch of salt and sauté in 2 tablespoons of olive oil over medium heat for about 10-15 minutes.


If you don’t have a stash of homemade breadcrumbs​ in the freezer, make some now in the food processor.

Stack, roll and cut basil into thin ribbons.


2. Prep Mise en Place for Pie Crust

3. Make the Pie Crust
Add the flour, cornmeal, salt, and parmesan to a food processor with the regular blade attached. Pulse 2 or 3 times to blend. Add the butter slices and pulse 7 or 8 times until you can see little chunks of butter covered in flour and meal.

Add the chilled water and pulse a few more times until dough is just blended and forms pea-sized balls. I know this doesn’t look like it is blended enough, but as those little balls melt, they create steam that causes the puffiness in a flaky crust. We want them to melt in the oven and not in the food processor which is why we keep the dough cold and underworked.

Dump the crumbly dough onto a sheet of parchment paper. Fold the right side of the paper over the dough and roll it with a rolling-pin. Now fold the left third of the paper over the dough and roll again. Notice how you can still see the chunks of white butter in the dough in the third picture.

DSC_4040

Roll the dough out, between two sheets of parchment paper until it is at least 9 x 13 inches.  Test for proper size by laying the pan over the dough to see if it fits.

Remove the top sheet of parchment paper and flip the dough over into the baking pan. Center the dough by using the edges of the top sheet of parchment paper. Once centered, remove the top sheet of paper.

Trim the dough and use the trimmed pieces to patch the crust until it fits in the pan neatly. Use the tines of a fork to poke holes in the crust. Lots of holes. This allows air to escape while baking, so you don’t end up with a lot of air bubbles.

Preheat the oven 375º. While it heats, place the dough-lined pan in the fridge to chill for the 15-20 minutes it takes to heat the oven. This is a necessary chilling period.

Bake for 15 – 20 minutes, or until crust is golden brown. About 10 minutes into cooking, open the oven door and add a few more fork pricks into any bubbles that have formed in the crust. Allow crust to cool for 5-10 minutes before filling. Remember, the goal is not to have a soggy crust once we add the filling. Therefore, some cooling down is necessary.

4. Prepare the Tomato Pie Fillings
While the crust is cooking, remove the tomatoes from the colander and gently squeeze out the excess moisture with your hands. Pat the tomatoes dry with paper towels.

Combine the mayonnaise, cheeses, and basil in a mixing bowl. Stir in the onions (red or yellow) and bread crumbs.

5. Assemble and Bake the Pie
Here’s what you have now: tomatoes, cheese and onion mixture, bacon and cooked cheese pie crust.

Add the cheese filling to the cooled crust and then add the bacon.

Arrange the tomatoes over the top. Lightly drizzle a little olive oil over the tomatoes and some cracked pepper and sea salt.

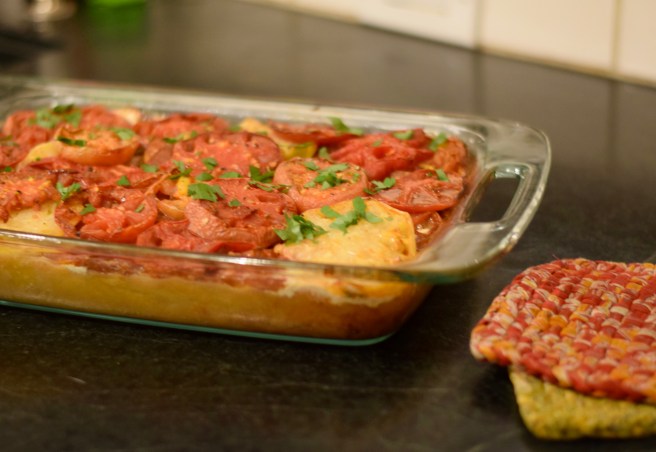
Bake for 50-60 minutes. Pie is done when the filling is bubbling, and the tomatoes are lightly browned.

Dinner is served!

Related Tomato Posts
Fresh Marinara Sauce with Pasta
Gazpacho Galore
Roasted Ratatouille
Roasted Roma Tomatoes

Always check the website for the most current version of a recipe. Thanks!

© 2014-2017 Judy Wright. All rights reserved. Photos and text may only be used with written consent.

Basic Old-Fashioned Mashed Potatoes

DSC_3449

My grandson turned one this week, and in celebration, I wanted to make a birthday dinner full of foods he could eat by himself with his adorable little hands. I chose Judy’s Mom’s Meatloaf, Amazingly Delicious Sautéed Carrots, mashed potatoes and a funfetti cake.

He loved everything and entertained us all as he picked away at his food with focus and determination.

It has been easily five years since I last made a bowl of creamy, mashed potatoes. I’ve been roasting them for so long it hardly ever occurs to me to mash them anymore, but have I ever been missing out. They were good. The calorie count wasn’t too bad, either. I only used six tablespoons of butter and one-half cup of milk for three pounds of potatoes. I like to make mashed potatoes with a combination of Russets and Yukon Golds if I have both in the potato bin; Russets for their high starch content and Yukons for their great flavor.

When I looked at a photo of my dinner plate, its plainness brought back memories of my childhood dinners: starch, vegetable, protein. That threesome was a religion for my mother.

Ingredients

3 pounds potatoes (5-6 large), peeled and quartered
½ cup milk, whole or 2% reduced fat
6 tablespoons butter
Salt, to taste. I used ¾ teaspoon (plus the tablespoon that went into the potato water)
Pepper (optional)

Mise en Place

Instructions
Fill an 8-quart pot with water and one handful (1 tablespoon) of salt. Bring to a boil. You will want enough water to cover the potatoes by about an inch.

While waiting for the water to boil, peel and quarter the potatoes. Cut potatoes into uniform chunks, so that they will cook evenly.

When the water comes to a boil, add potatoes. Bring water back to a boil and set a timer for 15 minutes. After 15 minutes of cooking, check for doneness by piercing a potato with a sharp knife. It should go in easily. If it doesn’t, add 5 more minutes of cooking time and test again. If you are not sure if they have cooked enough, just taste one. When finished cooking, drain potatoes in a colander and allow the steam to dry them. You want the potatoes to be hot and dry when you add the butter mixture.


Heat butter and milk in either a microwave or a saucepan until the butter is melted and the milk is hot, but not boiling.

Place potatoes in a bowl and mix for about 20 seconds on slow speed. Add the hot butter/milk mixture and ½ teaspoon of salt. Mix until potatoes reach the consistency you desire — lumpy or whipped.

“Salt to taste” Add more salt according to your taste preferences, realizing that the interior of the potatoes have already been salted while they were boiling and there is salt in the butter. To adjust salt: add salt in increments of ¼ teaspoon. For this batch, I only needed to add ¼ teaspoon more for a total of ¾ teaspoon.

Serve hot. They do not taste as delicious reheated. Better to store prepped, uncooked potatoes in a bowl of cold water until dinnertime and then cook, rather than make them earlier in the day.

Kitchen Tip: When you smell something bad or rotten, in the kitchen always check the potato bin first. That happened to me this week and sure enough, there was a rotting potato in my basket of homegrown new potatoes.


Related Posts
Judy’s Mom’s Meatloaf
Amazingly Delicious Sautéed Carrots

Always check the website for the most current version of a recipe. Thanks!

© 2014-2018 Judy Wright. All rights reserved. Photos and text may only be used with written consent.