When I wake up in the morning a little panic-stricken thinking about what I’m going to prepare for a large crowd coming in for a holiday weekend, I approach the menu by considering my entrée options first. My go-to’s are grilled Premio Sweet Italian Sausage from Costco, Brooks’s Marinated Pork Tenderloin, and marinated chicken breasts.
Next, I consider my sides, which I prepare depending on what is in season. Often, though, I delegate the sides to guests. The beauty of this approach is you get to try other people’s specialties, and that is always a fun and tasty option. Desserts are my favorite food to cook, and for a large crowd, I like to make a hotel-sized pan of the ever crowd-pleasing Pumpkin Bread Pudding only made with seasonal fruit instead of pumpkin, and either Italian Sesame Seed Cookies.
I was never a fan of grilled chicken breasts until I saw my friend from Tiverton, R.I., Sheila, a master at feeding huge crowds, carry Ziploc bags full of pounded-flat marinated chicken breasts out to the grill. By pounding the breasts flat Sheila could ensure the chicken would cook quickly and evenly throughout. I’ve been pounding chicken breasts ever since.
Ingredients:
Whole chicken breasts (for these photos, I made 24 breasts equalling 8 pounds) @JudysChickens Everyday Salad Dressing
1-2 lemons, sliced thinly (depends on how much chicken you are preparing)
10 stems of thyme, rough chopped
a couple shakes of white balsamic vinegar, if you have it.
Instructions:
Rinse chicken breasts and trim fat.
Pat dry with paper towels.
Place each chicken breast in a thick bag and pound flat with the smooth side of a meat mallet.
Marinate pounded breasts in @JudysChickens Salad Dressing along with lots of sliced lemons and sprigs of thyme. You could add a little white balsamic vinegar and Grey Poupon for even more flavor if desired. Allow to marinate for a few hours to up to two days.
Grill for no longer than ten minutes.
Favorite Flavor-Enhancers: The Acids!
My mother always kept a bottle each of white and red balsamic vinegar in the fridge. She especially loved the white. Add a few shakes of white to the marinade for an extra burst of flavor.
Ten years ago we took our children to Sicily to explore my family’s roots. One daytrip found us driving up a scenic mountain road looking for the small town of Isnello, home of my great-grandmother on my father’s side. The winding country road was slow-going and more than once we had to wait for a herd of goats to pass. Along the way, we passed something very unusual — a grove of nude trees.
As we continued along the road, we saw more nude trees and stacks of bark on the ground.
We pulled over to investigate and suddenly realized we were looking at a cork tree farm. Cork oaks, Quercus suber, to be exact. We were all so excited to figure this out; it seemed like the light bulb went off in all of our heads at the same time. Where corks came from was just not one of those questions any of us had ever considered, and now the question and the answer were presented to us at the same moment. That was memorable.
Slabs of cork bark are harvested from cork oaks every nine to twelve years. The trees, which often live for 250-300 years, need to be 25 years old before their cork can be harvested. It is a good example of a renewable resource. The harvest from one cork tree can be used to make 4000 corks.
Here is a video that shows the production of corks from harvest to bottle cap. Section 4:45 on the timeline shows a drill punching out corks from a strip of bark. If you look closely at the corks, you can see the age lines of the bark, generally 9-12 years of tree growth.
I was a collector of wine corks long before seeing the cork oak grove simply because I loved the cork’s texture and graphics. Since visiting the grove, I’ve become incapable of throwing away a cork. I am that person who slips wine corks into her purse at dinner parties.
A year after our trip, I was in the middle of a kitchen renovation when the idea hit me to make a wall-sized corkboard on the wall above my cookbook shelves.
My husband built the frame for the bulletin board using a very thin sheet of plywood for the backing and pine trim for the frame. I used a polyurethane stain as a finish.
The board is anchored into the wall studs with four screws, each of which is covered with corks that have pink nail polish painted on them so we can locate the screws should we ever want to remove the corkboard.
I made another corkboard for the space above my sewing machine nook.
I did not frame it. Instead, I custom built it to fit into the cabinet space that surrounds it. The corks are glued onto thin plyboard which is fastened to the wall with screws.
Over the summer, I made four corkboards, one for each of the homes my sons and niece were moving into. They all wanted black frames. Each is two feet by three feet and uses about 500 corks. The frame and backboard weigh five pounds, and the corks weigh about six pounds. Before you take on this project, you’ll need to save a lot of corks.
My husband built the frames, and another relative, Uncle Steve, who was visiting, puttied, sanded, and painted the frames. After I posted a plea for corks on Facebook, friends and family, near and far, either mailed boxes of corks to me or dropped them off at my front door. I am so grateful to the people who shared their stash with me.
Supplies You Will Need:
About 500 wooden corks (weighs about six pounds)
Plywood backing
Two six-inch strips of wood trim to build the frame (see photo)
Miter box and saw
Hot glue gun with a refill package of long glue strips
Cutting board and knife for trimming corks
Yardstick and pen to draw guidelines on the plyboard
Lightweight wood filler
Sanding block (fine)
Primer, spray-on works fine
Paint- I used one with a satin finish
Small paintbrush
Two eyelet screws
40-pound picture hanging wire
Instructions:
Buying the Backing and Frame Materials
To keep the weight down on the finished product, I use the thinnest sheet of plywood backing I could find. I usually ask the salesmen at Home Depot to cut the plywood down to the size I need.
On a slow day, I can often get him to miter-cut the trim pieces for me, too.
If we do the trim cuts at home, I add an extra length of trim in case we mess up on our cuts.
Building the Frame
My husband took the two six-foot long trim strips and used a miter-block to cut them down to the proper size which was previously measured to fit around the plywood exactly.
He then used wood glue to attach the molding to the back board. He used clamps to keep the trim in place while it dried. You could also use a nail-gun to keep the frame in place, but you will have to come back and fill in the nail holes with putty.
Putting a Finish on the Frame
First use wood putty to fill in the crevices of the mitered corners. Allow to dry and then lightly sand with a fine block sander.
Apply a coat of white primer paint. Primer raises the fibers on wood, so once it is dry, you will need to sand the surface again. Wipe away the dust with a cloth.
Use a paint brush to apply the paint. I tried using a can of spray paint, but I didn’t like the drip marks it left so I switched to regular paint. Allow paint to dry overnight.
Applying the Corks
Draw horizontal guidelines across the plyboard, approximately every three inches, to help you lay out even rows of corks.
Start at the bottom of the board, two corks vertical followed by two corks horizontal. Choose corks that are the same length for each of the twosomes. When you get to the end of the row, you may have to use a knife to trim corks to make them fit.
I lay out an entire row of corks first and then come back with a hot glue gun to glue them into place. The corks should fit snuggly.
I place all the corks with their graphics and words readable from the same direction, both vertically and horizontally. Thus, whether you choose to hang the finished board vertically or horizontally, the corks will all face the same direction.
Continue in this pattern all the way to the top of the plyboard.
I usually need to do some finagling to make the last three rows of corks fit nicely into the frame. It is definitely like a puzzle at the end. This is not the time to be a perfectionist. Once you start pinning things on your finished bulletin board, nobody will notice what you did to make the corks fit.
Installing the Hanging Wire
You will need two small eyelet screw and 40-pound picture hanging wire.
Lay the frame face down. Mark the frame on each side with a pencil one-fourth of the way down from the top corners. That’s about six inches down.
Make a small pilot hole over the pencil mark using a hammer and a nail one size smaller than your eyelet screw.
Screw the eyelet hooks into the pilot holes. The eyelet holes should face each other when properly installed.
Wrap the hanging wire through the eyelet hole a couple of times before running the wire across to the other eyelet screw.
More Ideas:
My friend, Libba, sent me photos of the cork wall on the bar in her home. I love the design! It looks like it was sprayed with a coat of polyurethane.
Her cork board inspired me to make this one; my all-time favorite board.
I used large champagne corks for the round pieces.
I made it for a wall in my office/studio.
Thank you to all my friends who left corks at my door and who took time to mail their stashes to me: Wayne, Maribeth & Michael, Albie and Sara, Bill & Kim, Frances, Beth, Millie, Caroline, and the people I’ve missed. It’s nice to know I am not the only one who can’t throw away a cork.
Knitting, cooking, and crafts — my inspiration for all of it came from my mother.
I love this recipe for zucchini bread. When my children were young, we lived in one of those neighborhoods where there were lots of children, fenceless backyards, car pools, and lots of sharing of recipes. This was one of those recipes. Lucy, our perky neighborhood teen babysitter, used to ride her bike down Sneed Road to our house; believe me, my children were as happy to see her as I was. One day, she brought a loaf of her mother, Ellen’s, zucchini bread. It was unusually moist and dotted with colorful green flecks from the zucchini peel.
The flecks give the bread texture and color that make it visually appealing.
The only change I made to Ellen’s recipe was to add more zucchini, nuts, and chocolate chips. One of my sons will not eat zucchini but loved this bread.
What to do with a baseball bat-sized zucchini?
Like for many of us, I often make zucchini bread when I find one of those baseball bat-sized zucchinis in the garden. If you do that, too, be sure to remove the large seeds before grating the flesh by quartering the zucchini into long strips and cutting out the triangular-shaped seed section. For large amounts of grating, I use the shredder blade in the food processor. Put the grated zucchini in a colander until ready to use. They will start to sweat, and you want that liquid to drain away.
Have no idea how I missed this! 7 pounds 6 ounces
Yield: 2 loaves or 1 loaf and 2 mini-loaves
Ingredients:
3 eggs
1 cup canola oil
2 teaspoons vanilla extract
2 cups granulated sugar
3 cups all-purpose flour
1½ teaspoons salt
1 teaspoon baking soda
¼ teaspoon baking powder
1 tablespoon cinnamon
1 pound unpeeled zucchini (a tad over 3 cups when grated)
1 cup walnuts or pecans, coarsely chopped
(Optional: add ½ cup chocolate chips)
Mise en Place:
Instructions:
Preheat oven to 325º if glass pans, 350º for metal pans. Grease loaf pans.
Coarsely grate the unpeeled zucchini and set aside. If liquid forms at the bottom of the container while it rests, discard it.
Beat eggs in a mixing bowl for 30 seconds on medium speed.
Add the oil, sugar, and vanilla and mix for two more minutes on medium-low speed. Beating these ingredients together at this point in the recipe is one of the things that gives fruit bread “lift” by incorporating air into the batter.
Add the dry ingredients: the flour, salt, baking soda, baking powder, and cinnamon. Remember, when measuring flour, spoon it into a measuring cup and level with a knife as opposed to packing the flour into the measuring cup by dipping it into a package of flour. You can read more about measuring ingredients in my home ec post.
Mix on slow speed for 30 seconds. Mix gently, you don’t want to stimulate the gluten in the flour to become tough and elasticky.
Add the nuts and zucchini and mix on slow speed until just mixed, about 30 seconds max.
If you plan to add chocolate chips, stir them in now.
Pour batter into prepared pans.
Cook for about an hour, or until a knife inserted in the center of the loaf comes out clean. Cool in pan for about 15 minutes and then remove from pan and allow to continue cooling on a wire rack. I usually need to use a knife to loosen the bread from the edges of the pan before turning it over to release it.
My friend, Patty, describes how she made the recipe gluten free in the Comments section. Patty also substituted 3/4 cup of honey for each cup of sugar. This makes for a darker bread that is delicious, but needs to be called Honey Zucchini Bread because the final flavor left in your mouth is honey instead of zucchini.
I never thought of adding chocolate chips to this recipe until I started making my cousin’s recipe for pumpkin bread: Marion’s Crazy Good Pumpkin Bread with Chocolate Chips. I thought her recipe was great with chocolate chips, and since zucchini and pumpkin are in the same family, I thought, “Why not?” It was delicious! Surprisingly, not too sweet.
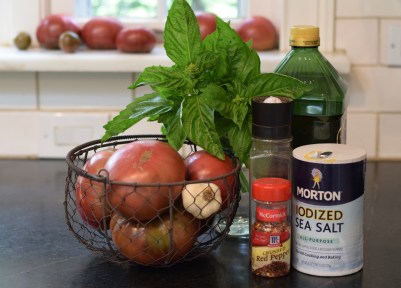
When I have gorgeous homegrown heirloom tomatoes sitting on the kitchen counter, I can’t help but try to capture their beauty with photographs.
Taking photos of tomatoes is what I was doing when my husband came home from work a few nights ago. He was hungry and there was no dinner in sight. He gently asked what we were going to eat. I lied and said I was just getting ready to make a marinara sauce. I asked him to go snip some basil. Marinara sauce only requires tomatoes, garlic, and basil and takes about ten minutes to prepare. I could have it made by the time it took the water to boil and the pasta to cook. Dinner.
Mise en Place:
Yield: 4 cups of sauce
Ingredients for the Marinara Sauce:
¼ cup extra virgin olive oil
6-8 cloves garlic, smashed and sliced (about one small head of garlic)
4 pounds of ripe tomatoes, cored, seeded and rough-chopped (about 8-9 cups)
2 teaspoons sea salt
¼ teaspoon crushed red pepper flakes or dash of cayenne pepper
15 leaves of basil, stacked and sliced (aka chiffonade)
2 teaspoons sugar (optional- use if tomatoes are acidic)
Ingredients for the Pasta:
8-12 ounces mozzarella, cut into one-inch cubes
1 pound pasta, cooked al dente
Grated Reggiano Parmesan cheese
Instructions:
Bring a pot of salted water to a boil. While waiting for water to boil, start prepping the vegetables.
Core tomatoes, slice in half (horizontally) and use your index finger to scoop out the seeds from each half. Next, rough-chop the tomatoes into 2-inch chunks. Note: If I have time, I sometimes do the extra step of peeling the tomatoes using the dipping them in boiling water method.
Smash, peel, and rough-chop the garlic.
Stack about 15-20 leaves of basil on a cutting board and slice into ribbons.
Pour the olive oil into a large sauté pan. I use a 6-quart pan. Warm the oil over medium heat and add the garlic. Sauté for about one minute until the garlic just starts to change color. Do not brown the garlic. If you do, discard it and start over. Add the tomatoes.
Add salt and a pinch of red pepper flakes or cayenne pepper. Cook on medium heat for about 8 – 10 minutes. Turn heat off and stir in basil. Taste and adjust seasoning. Delicious! You could eat with a spoon!
.
Meanwhile, cook the pasta according to package directions. If all goes according to plan, the pasta, and tomato sauce will be ready about the same time. Add pasta to a serving bowl. Add the mozzarella chunks and marinara sauce. Mix together and serve hot.
Pass the grated Reggiano Parmesan!
Here is a marinara sauce I made using only cherry tomatoes. It was sweet and delicious.
To see which varieties of regular tomatoes I am growing, check out this post and to see which varieties of cherry tomatoes, check this one.


 .
.


