Pasta e Fagioli (aka Ham Bone Soup!)

As Dean Martin would croon, “When the stars make you drool, just like pasta fazool, that’s amore.

From the minute I buy a cooked ham, I start thinking about the soup I’m going to make with the leftover ham bone. The soup I love to make with that ham bone is Pasta e Fagioli, AKA pasta and beans, a classic Italian comfort soup. And, once I start making the soup, forget it, I start humming Dean Martin’s song, That’s Amore. Ad nauseam.

I usually pick up a spiral-cut ham to have in the house for sandwiches during the holidays.  This Easter, I didn’t have a full house or a ham, but it is so automatic for me to make (and want) a hearty ham bone soup after a holiday that I drove to our local Honey Baked Ham store Monday morning to see if they had any ham bones for sale in their freezer. I was in luck, they were having one of their post-holiday buy-one-get-one-free sales, and I was able to pick up two meaty bones for seven dollars.

Technique Time: How to Add Layers of Flavor to a Soup
One of the cooking techniques I’ve learned over the years is the benefit of slowly sautéing chopped vegetables and aromatics in olive oil to create a flavorful foundation for soups, sauces, and stews.

Depending on who taught you how to cook, this flavor base is known as a soffritto, a mirepoix, or the “Holy Trinity.” For example, the French flavor base is called a mirepoix and includes two parts onion to one part celery and one part carrot, all of it chopped and sautéed in butter or duck fat. The Italians start with a soffritto that includes carrots, onions, and celery often with the addition of garlic, fennel, and parsley, and all of it sautéed in olive oil. In Cajun cooking, they have the “Holy Trinity” which consists of 3 parts celery, 2 parts onion, and 1 part sweet bell pepper, all of it sautéed in butter or oil. It is helpful to know these ratios as you start to create your own recipes.

DSC_0645

When making soups and even tomato sauces, you can add another layer of flavor by being intentional about what you use for the soup’s liquid base; the soup’s medium for flavor and heat. When you add raw or pre-roasted meat bones and simmer for a while, the bones’ marrow is released into the soup, and now you have enriched your soup or sauce even more.

DSC_0671

Finally, when making soup, you can add yet another layer of flavor to the vegetables you choose to use, such as the stewed tomatoes, beans, and fresh greens I used in this recipe.

DSC_0863

When you use this many layers of flavor, you’ll find you need to add a lot less salt, if any, to your recipe. I didn’t add salt to this soup because there is already plenty of it in the ham and cheese rind.

A few words on the main ingredients used to make Pasta e Fagioli.

The Beans
I start with a 20-ounce package of dried beans. The package comes with a seasoning packet that I have never used. In a pinch, you could use three cans of cooked beans, rinsed and drained.

DSC_0416

Take a moment to admire how pretty the beans look as you rinse and inspect them for tiny rocks and dirt. I love the different shapes and textures.

DSC_0648

Their color intensifies when rinsed, reminding me of pebbles rolling on the beach with the waves.

DSC_0433

You will need to soak the beans for a few hours to soften them, and then partially cook them before you start making this soup.

The Ham Bone
Recently, I happened to be at my favorite meat market, Hampton Meats, in Hopkinsville, KY on the day they were butchering a pig. I’ve been there on days when half of a cow was hanging there, too. There is nothing like seeing an animal carcass hanging on a hook to make you take a moment to reflect on the source of your food.  I have a copy of the “Meat Reference Manual” issued in 1942 by the U.S. Army for mess sergeants. I like the graphics of their meat charts and refer to them often.

IMG_4028 (1) DSC_0737 DSC_0736

Have you ever wondered why, when you get to the end of a spiral cut ham, getting the meat off the bone is no longer easy or pretty? It’s because the pig’s bulky ball and socket hip-joint are hidden in there. I dissect so you don’t have to.

DSC_0703 hip joint

The Greens:
Many of the cool weather greens growing in my backyard kitchen garden right now, such as kale, cabbage, chard, and spinach are suitable to use in soup because their leaves are thick and won’t disintegrate in the soup like lettuce would do. In the photo on the left, I’m growing “Alcosa” cabbage, a sweet and tasty variety of cabbage. I use the leaves while they are still young rather than letting them grow into a ball. In the picture on the right, I am growing “Winterbor” and “Red Russian” kale and “Bright Lights” chard. All will work well in this soup. Other choices that would work are spinach, collards, and escarole.

DSC_0524 DSC_0503

Ingredients:
DSC_0635

20-ounce bag of dried beans, picked over and rinsed
5 stalks celery (1/2 pound), finely chopped
4 carrots (1/2 pound), finely chopped
1 large onion (1 pound), finely chopped
1 small head garlic (1 ounce), finely chopped
1/3 cup extra virgin olive oil
1 cooked and meaty ham bone, trimmed of visible fat
2 cans “Italian Recipe” stewed tomatoes, puréed first
½  of the heel of a wedge of Parmigiano-Reggiano cheese
2 whole bay leaves
12 cups water (3 quarts)
8 cups greens: cabbage, kale, chard, spinach (greens optional)
1 box ditalini pasta

Mise en Place:
DSC_0639

Instructions:
1. To cook dried beans: Place rinsed beans in about 10 cups of water. Do not add salt to the water. Bring to a rapid boil, reduce heat and simmer for 1½ hours. They should still be somewhat firm, but edible. Drain and set aside.

2. Pull some of the meat off the ham bone to use to sauté the soffritto. Set aside.

DSC_0659

3. Add olive oil to a large frying pan and get it started heating up. Next, add the soffritto, the carrots, onions, celery and garlic and pieces of ham. Sauté over medium-high heat for 15 minutes, frequently stirring, while vegetables become translucent and very lightly browned.

DSC_0644 DSC_0648

In a large soup pot add the sautéed soffritto, the partially cooked beans, the ham bone, the 12 cups of water, the puréed stewed tomatoes, the cheese rind, and the bay leaves. Bring to a boil over high heat. Once the soup comes to a boil, turn the heat down to low and let it simmer for one hour, stirring occasionally. Test the beans to make sure they are cooked before adding the greens.

DSC_0675

Add the greens.
DSC_0682

Cook for five more minutes. Turn heat off and remove soup pot from the hot burner.

DSC_0685 DSC_0714

Pull the ham bone out of the pot and place it on a cutting board. Pull the meat off the bone, cut it into bite-sized pieces, and return the meat to the pot.

Cook the pasta:
Put a pot of salted water on the stove top to cook the pasta according to the directions on the box. I never cook pasta directly in the soup because it drinks up all the soup’s liquid. Store the cooked pasta in a separate container from the soup, so the noodles do not become mushy.

bridget soup

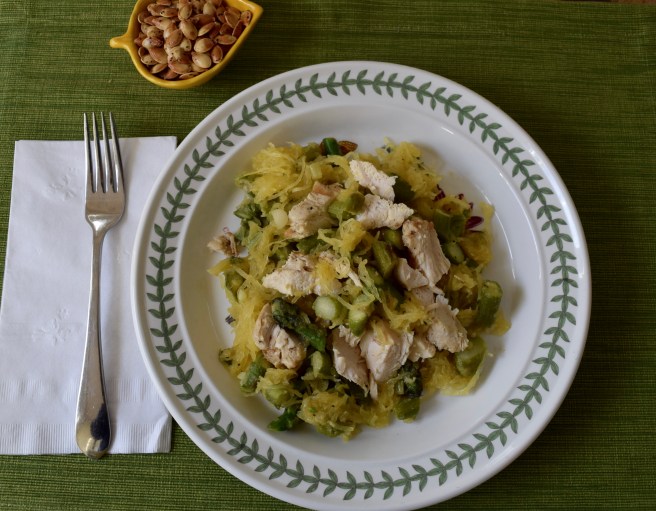
To serve soup, put a scoopful of ditalini in each bowl, top with soup, and pass the grated Reggiano cheese!

DSC_0712

Or, serve it without pasta.

dsc_0840

LET’S STAY CONNECTED!

Follow my photos of vegetables growing, backyard chickens hanging out, and dinner preparations on Instagram at JudysChickens.

Never miss a post: sign up to become a follower of the Blog.

© 2014-2017 Judy Wright. All rights reserved. Photos and text may only be used with written consent.

Chicken Cacciatore

What’s in a name? In common parlance, this dish is known as chicken cacciatore. Isn’t that a little odd: half the name in English, and the other in Italian? I’m guessing the name was conjured up by Italian-American restaurateurs hoping to entice Americans into their doors. In Italy, the dish is known as pollo alla cacciatora and translates in English to chicken, hunter’s style. Cacciare is the verb to hunt in Italian.

This dish is traditionally made with tomato sauce

but sometimes, I leave the tomatoes out.
img_3922

Cooking “alla cacciatora” includes the step of sautéing wild game in an acidic liquid such as wine, vinegar, or lemon juice to tame the gamey-ness of the meat. If the cook is sautéing rabbit, the dish is called coniglio alla cacciatora, and if wild duck, it’s anatra selvatica alla cacciatora.

A few words about ingredients: Make sure the bay leaves are fresh. They should have a woodsy, fragrant smell when you open the package — every time you open it. If they are no longer fragrant, it’s time to get a new package.

Chicken cacciatore is typically served over polenta, wide flat noodles, or rice.

Ingredients:
DSC_0592

2-3 bell peppers (1 pound), cut into bite-sized chunks
1-2 sweet onions  (1 pound), sliced
1-ounce garlic cloves (about 1 small head of garlic), smashed and peeled
½ cup olive oil
1 teaspoon sea salt
¼ teaspoon cayenne pepper
cracked pepper

3 pounds boneless, skinless, chicken thighs, cut into 2-inch pieces
½ teaspoon sea salt
1 teaspoon black pepper
½ cup all-purpose flour

3 stems rosemary leaves
3 stems oregano leaves
4 bay leaves
1 cup white wine

3 cans “Italian Style” stewed tomatoes
1 cup chicken broth
1 pound mushroom, sliced

Mise en Place:
DSC_0661

Mise en Place Instructions:
Prep peppers and onions: Remove the core, stem, and seeds, slice mushrooms.
DSC_0657

Prep garlic: Smash garlic cloves and peel.

Prep chicken thighs: Rinse, pat dry, trim fat and cut into 2-inch chunks DSC_0410

Prep herbs: Separate leaves from stems, use a scissor or knife to mince leaves. Never chop a bay leaf!
DSC_0643

Prep mushrooms: I like to use an egg slicer.
DSC_0623

Cooking Instructions:

Coat bottom of a 12-inch heavy-bottomed deep pan with olive oil. Warm the olive oil over high heat until it is hot, but not smoking. Add peppers, onions, garlic, salt, and cracked pepper to the oil and sauté for 5-7 minutes, stirring regularly. Turn heat off and set aside.
DSC_0683

If I am making this in the summer when fresh tomatoes are abundant, I add chopped tomatoes to the peppers and onions and omit the canned tomatoes.

In a separate bowl, season the chicken pieces with salt and ground pepper. Add flour and mix well. Do not do the step ahead of time because the chicken pieces will absorb the flour and clump together.
DSC_0685

Brown chicken evenly on all sides for about 5-10 minutes on medium-high heat. Stir often, so the chicken does not stick to the pan.
DSC_0698

Add the herbs and wine to the browned chicken and stir. Bring to a boil and simmer for 2 minutes.
DSC_0700

Add the bowl of sautéed vegetables and tomatoes to the chicken. Bring to a boil. Cover and simmer for 10 minutes.

Add mushrooms and broth (to thin liquid), cover and simmer for 30 minutes.

Let rest for at least 15 minutes before serving. This dish tastes even better the next day making it a great make-ahead dish.

LET’S STAY CONNECTED!

Follow my photos of vegetables growing, backyard chickens hanging out, and dinner preparations on Instagram at JudysChickens.

Never miss a post: sign up to become a follower of the Blog.

© 2014-2019 Judy Wright. All rights reserved. Photos and text may only be used with written consent.

Rachelle’s Italian Sausage, Onions, and Peppers

Dear Doris’s Italian Market and Bakery,

Please open a store in Nashville so I can get delicious homemade Italian sausage, sweet or spicy, with or without fennel, veal sausages, meatloaf mix and braciole-cut beef when ever I want them.
DSC_0236

And, please send Lester and his delightful butcher friends from the Boca Raton store, to the opening. They know stuff.
DSC_0250

Whenever I go to Florida to visit my family, I always make a trip to Doris’s and to Joseph’s Classic MarketAt Joseph’s, I buy the best sfogliatelle I’ve ever tasted
joseph's

and the best cannolis, with real cannoli cream.
1548163_10153779726690160_182987456_o

At Doris’s, I buy sausages galore: pork, veal and chicken, freeze them, pack them in my suitcase, and fly them home with us to Nashville. My husband goes with me to Doris’s because the store is so much fun to browse in, but he starts to shake his head when I start filling up the cart with pounds and pounds of sausages. Always the more practical one in the family, he wonders how I plan to get it all home. “Don’t worry honey,” I say, “I always find a way.”
DSC_0288

This year, because I was working on a recipe for a Portuguese stew, my sweet husband searched out and found fresh Portuguese linguica at Boca Brazil Supermercado. It’s one of the many reasons he is my Valentine and no other.
photo

I, meanwhile, am my grandfather Carl’s granddaughter — when he went to Sicily to visit relatives, ages ago, he brought home cured salami hidden from Customs inspectors in the toecap of a shoe that was packed in his suitcase. I thought that was strange as a child, but I totally get it, now.

A few weeks ago, when I was in Florida, Mom’s sister Rachelle made sausage and peppers for dinner on our first night in town. It’s her husband Steve’s favorite meal from childhood. Was it ever good! So good, we had to have a repeat performance later in the week so I could blog it.
DSC_0534

Part of the fun of making this dish was all of us going grocery shopping together to get the ingredients. As you can see, this recipe isn’t complicated.
DSC_0285

Because we didn’t live in a big city, with Italian markets, while growing up, my mother often bought pre-packaged Premio Italian Sweet Sausages. They are great in meat sauce and also excellent grilled. In Nashville, you can buy the Premio brand at Costco, five pounds for $12.00. The inhouse-made sausages at Doris’s are $3.50 a pound.
DSC_0087

Yield: Serves 6

Ingredients:
DSC_0298
2½ pounds Italian sweet sausage (8 links)
8 cups sliced sweet bell peppers (5 peppers)
5 cups sliced onions (3 medium)
1/3 cup olive oil
1 teaspoon garlic pepper
1 teaspoon sea salt

Mise en Place:
DSC_0378

Instructions:

This is truly the easiest recipe on the blog.

Prep veggies. Here’s Rachelle, favorite great-aunt to my children, chopping veggies.
DSC_0320 DSC_0351

Prep sausages: cut apart links.
DSC_0359

You’ll need two frying pans. One for the peppers and onions and one for the sausages.
DSC_0390

Sauté the onions, garlic pepper and salt in olive oil over medium-high heat until translucent and soft, about ten minutes.
DSC_0419

Add the peppers. Continue to sauté the peppers and onions over medium-high heat until the peppers start to soften, and then let them simmer over low heat while you cook the sausages.
DSC_0438

Sauté the sausages in 2 tablespoons of olive oil in a different pan.
DSC_0439

Brown on all sides over medium-high heat.
DSC_0445  DSC_0489

Slit sausages to allow heat to get inside. Cover pan and let simmer for 20 minutes over low heat.
DSC_0490

Add sausages to peppers and onions. Be sure to tap off as much fat as possible from the sausages before you add them to the peppers and onions.
DSC_0494 DSC_0510

Saute together for 5-10 minutes. It will look like this when it is done.
DSC_0520

Can be served as is, or over pasta, or in a hoagie. It works for Whole30 if you skip the bread and pasta and serve it with a green salad.

Two family photos of Rachelle, just for fun:
Rachelle, my grandmother Marion, and my brother Chris. Rachelle and Grandma are visiting us in Baltimore and by the looks of their hair, they’ve been to Bridget’s Beauty Shoppe.
rachelle marion chris

This is a photo of Rachelle in Sicily with Granddaddy Carl and Grandma’s cousins Marianina and Salvatore. Rachelle was in high school at the time.

LET’S STAY CONNECTED!

Follow my photos of vegetables growing, backyard chickens hanging out, and dinner preparations on Instagram at JudysChickens.

Never miss a post: sign up to become a follower of the Blog.

© 2014-2017 Judy Wright. All rights reserved. Photos and text may only be used with written consent.


Roasted Spaghetti Squash, Asparagus and Chicken

I love roasted spaghetti squash and have been making it weekly for about three months now. I started eating it as a substitute for pasta while on the Whole30 nutritional program but continue cooking it simply because I enjoy it all dolled up as a vegetable. When I tell people how much I love spaghetti squash, the first thing they ask is how do I cook it. I roast it. I’ll show you how.

DSC_0378

How to Prep and Roast a Spaghetti Squash:

DSC_0682 (1)

Preheat oven to 425º

Cut the spaghetti squash in half lengthwise. Be careful, the squash surface is hard, and the squash tends to want to roll around making it a challenge to cut. To get started, I usually stab it with a knife and then pull the knife down to create a fissure across one side. Next, I turn the squash over and do the same thing on the other side.

DSC_0222 DSC_0226 DSC_0234

Use a large spoon to scoop out the seeds and fibrous pulp.

DSC_0693

Line a roasting pan with parchment paper and place the two squash halves on it. Drizzle olive oil on each half and use a basting brush to spread the oil over the interior.

DSC_0700

Turn the squash over in the pan and roast for 45 minutes to one hour. The squashes I have been using have each weighed about four pounds and were fork-tender in one hour. Smaller squash will cook in a shorter amount of time.

DSC_0703 DSC_0734

Remove from oven and turn the squash over. You’ll immediately notice the stringiness of the squash. Use a fork to scrape the sides and fluff the tender, caramelized pulp. At this point, it is an empty canvas for whatever you wish to do to flavor it, much like spaghetti.

DSC_0112 DSC_0113

This is one of my favorite ways to prepare spaghetti squash for a delicious, healthy, low-carb side dish, or if you want to make it an entrée, add cooked chicken.

Yield: 2 servings as an entrée

Ingredients:

DSC_0296

½ roasted spaghetti squash (3 cups or 1.5 pounds cooked squash)
2-3 tablespoons extra virgin olive oil
1 bunch asparagus (1 pound un-prepped)
1 bunch green onions (4 ounces un-prepped)
1 clove garlic, minced
2 cups cooked chicken, cut into bite-sized pieces
Sea salt and garlic pepper to taste. Start with ½ teaspoon of each and add more as desired.

Mise en Place:

DSC_0344

Use a fork to shred and toss the roasted spaghetti squash.

DSC_0322

Prep the asparagus and green onions.

DSC_0309  DSC_0314


Saute asparagus and onion in olive oil for about 5 minutes on medium-high heat. Add garlic and sauté for 3 more minutes.

DSC_0346

Stir in squash. Add sea salt and garlic pepper to taste. When I was just learning to cook, I hated to read the words “to taste.” I had no idea where to begin. My advice is to start with ½ teaspoon of salt and garlic pepper (¼ teaspoon if just using plain pepper without the garlic). Add more seasoning until it tastes good to you. We happen to use less salt than most people.

DSC_0351

I decided to make this an entrée for dinner and added grilled chicken.

DSC_0382

Sprinkle with Parmesan, if desired.

For a quick side dish, mix shredded squash with salt, garlic pepper, butter, and Parmesan. Another way to serve is to toss it with marinara sauce.

Cooked squash will last in the refrigerator for about 3-4 days before it turns mushy. Alternatively, store it in a bag and freeze until ready to use.

Buon Appetito!

DSC_0577

LET’S STAY CONNECTED!

Follow my photos of vegetables growing, backyard chickens hanging out, and dinner preparations on Instagram at JudysChickens.

Never miss a post: sign up to become a follower of the Blog.

© 2014-2017 Judy Wright. All rights reserved. Photos and text may only be used with written consent.